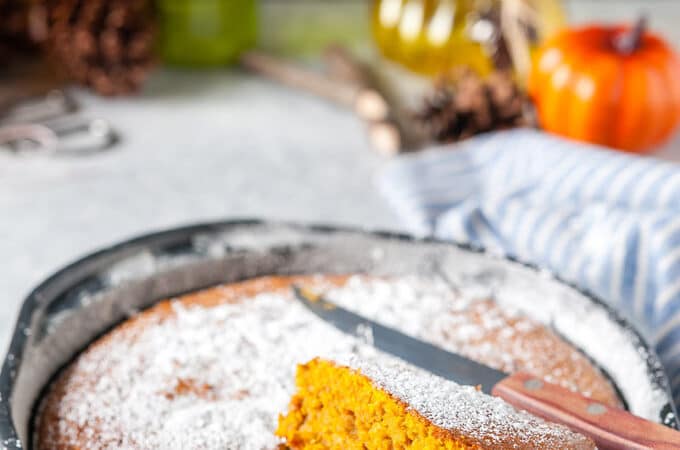
June 06, 2010

Pan-Fried Eggplant and Tofu with Garlic Black Bean Sauce

I make eggplant with this sauce quite often. Sometimes I add chopped tomatoes or roughly chopped onions instead of tofu. Sometimes I add a few leaves of parsley or cilantro. A lot of times it's just eggplant without anything extra. It's still very tasty and flavourful. Usually I cook the eggplant in sauce which makes the finished dish look somewhat not too photogenic, so this time I decided to take a different approach and pour the sauce on top. I must say, however, that as soon as I took the picture I mixed everything together and it was as good as always.

Pan-Fried Eggplant and Tofu with Garlic Black Bean Sauce

For 1 very generous serving or 2 portions if served over rice noodles or vegetables.

  • Asian eggplant - 2
  • Firm tofu - 1/2 package
  • Oil - 2 tablespoons
  • Black bean sauce - 1 heaping tablespoon
  • Garlic, minced - 1 teaspoon
  • Ginger, grated - 1 teaspoon
  • Sesame oil - 1 teaspoon
  • Parsley, sesame seeds to taste


- Wrap the tofu in paper towel and squeeze excess liquid without breaking the tofu.
- Cube the tofu.
- Heat 1 tablespoon of oil in a pan on medium heat.
- Fry the tofu cubes until the crust forms, about 1-2 minutes, flip the cubes and fry on the other side. You may wish to fry every side or just two.
- Transfer the tofu onto a paper towel.
- Slice the eggplant and quarter each slice.
- Heat the remaining 1 tablespoon of oil in the pan and fry the eggplant on medium heat for about 1-2 minutes.
- Make the sauce: mix the black bean sauce, garlic, ginger and sesame oil.
- Add the sauce to the eggplant, lower the heat, cover the pan with a lid and let the eggplants soften for about 5-7 minutes.
- Add the tofu cubes to the pan, mix and heat through.
- Serve sprinkled with sesame seeds and chopped parsley/cilantro.

Eggplant

Comments
- As I mentioned above, tofu is not mandatory in this recipe. It can be substituted for chopped tomatoes and/or chopped onion, this way everything is cooked together.

Tofu


Parsley on Foodista

 
May 30, 2010

Pumpkin and Bran Vegan Pancakes

Kate from Soupasana and I were recently talking about the sizes of Pumpkin Puree Cans and those are huge (540ml), so I've been trying to use it all up and I finally succeeded!! I've been looking for smaller cans for the last little while, but with no luck; although in my search for them I actually found much bigger cans. And I mean much bigger. I think if I were to buy them, I'd turn into a pumpkin.

I had a little bit of pumpkin puree left after making Pumpkin, Garlic and Chili Bread and "Pumpkin Pie" Bruleed Oatmeal and every time I opened my fridge it was looking at me and pleading to be used. First, I wanted to use it in Pumpkin Oatmeal again, but mornings are frantic with me trying to get ready for work and not be too late. I entertained the thought of making Pumpkin Lentil Soup, but the weather here in Toronto was really hot and eating a hot soup didn't sound like a good idea. Finally, I figured it out - Pumpkin Pancakes! I had some soy milk in my fridge which I wanted to use up, so after having to use that I figured that I might as well try to make the pancakes vegan. I completely made up this recipe and up until I tried the first pancake I was not sure if it would work. Oh my, those were really good!!! They had this characteristic yeasty after-taste which I adore because I decided to be fancy and used yeast as a leavening agent instead of baking powder. Apple sauce and Pumpkin made the pancakes fruity and Bran made them taste a little bit like Bran muffins, so they reminded me of dessert.


Pumpkin and Bran Vegan Pancakes

for 15-18 small pancakes

  • All-purpose flour - 2/3 cup
  • White rice flour - 1/3 cup
  • Bran - 1/4 cup
  • Brown sugar - 2 tablespoons
  • Dry yeast - 1/2 teaspoon
  • Salt - 1/4 teaspoon
  • Pumpkin puree - 1/4 cup
  • Apple Sauce - 1/2 cup
  • Soy milk - 1 cup
  • Oil - 1 tablespoon + more for the pan


- In a large bowl whisk together both flours, sugar, bran, salt and yeast.
- Warm the milk to about 40C (body temperature).
- Add warm milk to dry ingredients and mix.
- Add pumpkin puree, apple sauce and mix well.
- Cover the bowl with plastic wrap. Fill the sink with hot tap water, place the bowl with batter into the hot water and let stand for about 1-1.5 hours, until the batter become light and very fluffy.
- Whisk in the oil.
- Brush a non-stick pan with some oil and heat.
- Drop about one tablespoon of batter onto the hot pan for each pancake and cook 2-3 minutes on low-medium heat until bubble begin to appear on the surface of the pancakes.
- Flip the pancakes and cook for another 1-2 minutes.
- Serve with maple syrup.


Comments:

- Baking powder can be used instead of yeast and in this case there's no need to leave the batter to rise for an hour in hot water. I still urge you try them with yeast as the flavour is very different from normal pancakes.
- More sugar can be added if they are not served with maple syrup or jam.


Pumpkin and Bran Vegan Pancakes

 
May 18, 2010

Pumpkin, Garlic and Chili Bread

It took me a very long time to develop friendship with yeast. I tried and failed quite a few times before I was able to produce a real loaf of bread. Once that happened, though, I was not scared anymore. I finally understood the science, the magic behind making yeast dough. Art of Bread course at George Brown College was one of my favourite. How can you resist the smell of freshly baked bread? I love smelling my hands after working with the dough, the aroma is so comforting, calming and warm. This bread is great. It has a nice soft texture with great crust and subtle garlic and chili flavour. Both garlic and chili can either be omitted or even increased for an even more pronounced taste.


Pumpkin, Garlic and Chili Bread

 
recipe adapted from carina-forum

for 2 medium loaves


  • Bread flour - 450-480 g
  • Dark rye flour - 50 g
  • Water, warm - 125 ml
  • Canned pumpkin puree - 400 g
  • Dry yeast - 7 g 
  • Malt - 4 g 
  • Sugar - 1 teaspoon
  • Salt - 2 teaspoons
  • Garlic - 4 cloves
  • Chilies - 3 small 
  • Vegetable oil - 2-3 tablespoons
Pumpkin, Garlic and Chili Bread Ingredients 


- Dissolve the yeast in 30 ml of water with sugar. Let stand for 10-15 minutes.
- Slice the garlic and cut the chilies in half.
- Pour the oil in a small pot, add the sliced garlic and chilies together with the seeds, heat and cook for a few minutes until the oil becomes flavoured with garlic and chili essence. Cool and strain.
- Add the rest of the warm water (100 ml) to the yeast. Add the malt, pumpkin pure and mix well.
- Slowly start add both kinds of flour and start kneading the dough adding more and more flour. You might need more or less flour depending on how much moisture is in the pumpkin pure.
- Add the salt and oil and knead for 10-15 minutes until the dough is elastic.
- Form the dough into a ball and place in an oiled bowl in a warm place. Cover with plastic wrap and let it proof for about an hour or until it's risen twice its original size.

Pumpkin, Garlic and Chili Bread

- Punch the dough to release air bubble. Form the loaves, put them on a floured baking sheet, cover with a kitchen towel and let them proof for another 30-40 minutes. The dough should rise a little bit more.
- Heat the oven to 450F. Place a pan with cold water in the stove to help create steam.
- Bake the bread for 7 minutes, then turn down the heat to 410F and bake for another 35-30 minutes. Cover with foil if the bread begins to brown too quickly.

Pumpkin, Garlic and Chili Bread

Comments
- I added a little bit of garlic oil and chili oil into my vegetable oil.
- Homemade pumpkin pure can also be used. I made the bread with canned and homemade pure, to be honest, I didn't taste the difference, but canned is a lot easier and more convenient.
- Rye flour is not required, regular bread flour can be used instead.
- My favourite way of proofing the dough is to place a bowl in a sink filled with hot tap water and let it stand there for an hour or two. 
- The dough can also be proofed in the fridge over night. Let it come to room temperature before forming the loaves.


 Pumpkin, Garlic and Chili Bread  Pumpkin, Garlic and Chili Bread
 
May 09, 2010

"Pumpkin Pie" Brûléed Oatmeal


My inspiration for this dish came from my friend who desperately needed to use up all the canned pumpkin and started adding it practically everywhere. The combination of oatmeal and pumpkin intrigued me to the point that I was thinking about it everyday for about a week before I finally bought some canned pumpkin and decided to try it out. The rest just came together easily since it was a no-brainer for me that pumpkin should be paired with classic Pumpkin Pie spices like cinnamon, ginger, cloves and nutmeg. The final component, or maybe it's better to call it a technique, was a spontaneous decision. I've had my Brûlée torch for quite some time and only used it twice in the last few years. I also thought that the crunch of hard, caramelized sugar would pair nicely with the soft texture of oatmeal. The result was fantastic, warm and satisfying oatmeal that can easily double as a dessert. I know it's a strange choice to use those fall flavours in May, but the temperature dropped to +5 here in Toronto over the weekend and it really felt more like autumn than spring.

"Pumpkin Pie" Brûléed Oatmeal

For 1 large serving

  • Rolled oats - 1/2 cup
  • Soy milk - 3/4 cup
  • Canned pumpkin puree - 1/2 cup
  • Vanilla extract - 1/4 teaspoon
  • Cinnamon - 1/4 teaspoon
  • Ground dry ginger - 1/8 teaspoon
  • Nutmeg - a pinch
  • Ground cloves - a pinch
  • Salt - a pinch
  • Dark brown suger - 1 + 2 teaspoons


- In a small pot, whisk together the milk and pumpkin puree.
- Add all the spices and 1 teaspoon of brown sugar. Heat the mixutre.
- Add the oatmeal and cook whicking occasionally for about 7-10 minutes until the oatmeal is soft and the liquid is absorbed.
- Pour the cooked oatmeal into a bowl and spread the remaining 2 teaspoons of brown sugar on top. Torch the sugar until it hardens. Alternatively, place the bowl under a broiler for couple of minutes to melt and caramelize the sugar.


Comments
- Regular milk or any other type of non-dairy milk can be used in this recipe. Water can also be used.
- Use the spices according to your taste. I don't like cloves too much and next time I am going to omit that spice.
- Canned pumpkin can be substituted for normal pumpkin, which should be baked and processed in a blender.


"Pumpkin Pie" Brûléed Oatmeal

 
May 01, 2010

Two Gourmet Three-Course Dinners for Two for Under 15$

Recently I decided to participate in a very interesting contest hosted by my favourite cooking forum. The goal was to cook a Gourmet 3-course dinner for two and spend no more than 15 euros which is approximately 20 canadian dollars. The idea seemed fun, intriguing and challenging, so I decided to try it out, although I was quite skeptical. When I hear the word "gourmet" I start thinking about exotic dishes and products like seafood, truffles, caviar. Is this even possible to cook a meal for two, make it a little bit above ordinary and spend under 20 bucks? It turned out that not only it's possible, but quite easy. The most difficult part was to do the calculations. Do you know how much two table spoons of white sugar cost? I do now. And what about quarter cup of orange juice or one table spoon of butter. It was fun, exciting and... tasty :) So much so that I decided to do it twice, because as someone said "if one is nice then two is twice as nice".

It took me some time to come up with the first menu. My original idea included Banana Almond Pudding with Banana Ice Cream, Chicken in Cream-Kumquat Sauce with Rice and Mini-Quiche with Blue Cheese and Pears. Then I realized that it'll take me a long long time to cook all this with making of pastry, letting it rest, blind-baking it and then making quiches; marinating chicken and making the sauce separately first; baking puddings just before serving - too much work for a simple dinner that wasn't even a celebratory occasion. So, the menu changed and the only item left from the original idea was the ice cream.

Menu #1

Table setting


Click on the link below to see both menues

 
March 29, 2010

Peanut Butter and Jam Bread Pudding

I really like classic combination of salty peanut butter and sweet jam. I try not to eat peanut butter and jam sandwiches because unfortunately once I start, I cannot stop. One, two, three sandwiches is never enough and although my brain knows the limit, my stomach doesn't. So, I rarely allow myself to have this simple and tasty treat. Almost a year ago I saw this recipe on a food network show and I instantly knew that I had to make it. Finally, a few weeks ago I got around to baking this delicious bread pudding for breakfast. It tasted really good, like a warm peanut butter and jam sandwich with custard. This custard, however, was also something that bothered me a little bit in this dessert. The top crusty layer of the dish was divine, whereas the custard was... well... custardy. I think that next time I'll take a bigger dish and pour the mixture in single layer so that there's less custard bits and more crunchy parts. I used soy milk in this pudding but it can be made with whole milk instead.

Peanut Butter and Jam Bread Pudding

recipe adapted from an episode of Fresh with Anna Olson

for 6-8 servings

  • Unsalted butter- 3 tablespoons
  • Peanut butter- 2/3 cup
  • Soy milk at room temperature- 1-3/4 cup
  • Eggs at room temperature- 3 large
  • Sugar - 1/3 cup
  • Vanilla extract- 1 teaspoon
  • Cubed baguette - 6 cups
  • Raspberry jam or other fruit jam- 2/3 cup


- Preheat oven to 350°F (180C).
- Melt butter and brush pan with some of it.
- Add peanut butter to remaining melted butter and heat over low heat until fluid.
- Remove from heat and whisk in soy milk, then whisk in eggs, sugar and vanilla.
- Toss mixture with diced bread and let sit 10 minutes.
- Spoon mixture into prepared pan and dollop jam over bread, pressing in slightly to incorporate just a touch.
- Place pan in a larger dish and fill it with an inch of hot tap water.
- Bake for about 50 minutes, until golden on top and set.
- Let pudding sit for at least 30 minutes before serving.
- Pudding can be served warm or chilled.


Comments
- As I mentioned above, I think it would taste better in a bigger dish with bread cubes spread in an even layer.
- Also, one more cup of bread would be fine to add to this amount of custard.
- The result is intensely peanut-buttery.
- The pudding tastes better the next day reheated.

Peanut Butter and Jam Bread Pudding

 
March 23, 2010

Warm Cottage Cheese, Artichoke and Sundried Tomato Dip

I love food. Any kind of food: desserts, main courses and maybe one of my favourite - appetizers. Why is it that appetizers always look so much more tempting than entrees on practically any restaurant menu? Almost every time I go to a restaurant it's a struggle to choose just one starter to eat. Sometimes I secretely wish that I could have a few (or, who am I kidding, a lot) of the small dishes instead of having one entree. I guess this is why people go out to Spanish restaurants for tapas, right? My boyfriend, however, has a very different idea about appetizers. A few weeks ago I listened in disbelief when he mentioned his dislike for tapas. Really? Who doesn't like tapas? Perfect little appetizers they are! One of my favourite things to order as an appetizer is a dip. I rarely get it by myself, but sitting at a pub with a few of my girl friends and sharing a warm gooyey and cheesy dip, drinking martinis or beers and gossiping is a perfect way to spend an evening.

Warm Cottage Cheese, Artichoke and Sundried Tomato Dip

This recipe serves 2-4 people as an appetizer.

  • Cottage cheese - 1 cup
  • Mayonnaise (or sour cream) - 2 tablespoons
  • Marinated artichokes, drained - 1 jar (170 ml)
  • Garlic, minced - 1-2 cloves
  • Flat parsley leaves - 1/2 cup
  • Cheddar cheese, grated - 70 g
  • Sundried tomatoes, dry and not in oil, chopped - 30 g (about 6 halves)
  • Salt, pepper to taste

- Process the cottage cheese in a blender or a food processor until it becomes smooth and not grainy anymore.
- Add the rest of the ingredients and process until the desired consistency. It can be processed into a very smooth paste or left a little bit chunky as on the picture.
- Season to taste.
- Pour the dip into an ovenproof dish and bake at 350F (180C) for about 15 minutes until the dip is warm and melting.
- Serve with toasted bread or crackers.
 
Comments
- I made the dip twice and both times I felt like it needed a squeeze of lemon juice.
- It's a very easy dip that is not too unhealthy as it's based on healthy cottage cheese instead of mayo or cream cheese.


March 17, 2010

Yeast Buttermilk Waffles

I resisted the urge to buy a waffle-maker for about two or three years. Each time I saw a waffle recipe I quickly turned away, I closed my eyes and I thought of something else. I tried to convince myself that a waffle is just a pancake cooked on a different surface. I talked to myself countless number of times and patiently argued with a little voice in my head explaining that I have no space in my tiny kitchen for another appliance. I tried in vain to remind myself that I don't make pancakes often and getting a special gadget is not a smart way to spend money. Finally, a few months ago I gave up. I cursed all the way to the store and desperately tried to persuade myself to turn around. And then on the way home I was childishly happy, giddy and excited, bringing a new shiny appliance home. At the end of my losing battle, in the store, staring at various shapes and sizes of waffle-irons, my mind was still trying to reason with me. "Buy a cute, round, small one," it said, "you don't need a big one, you don't have a huge family to feed." But after so many years of fighting with reason, my desires won over and I got the biggest waffle-maker that makes six square waffles at a time. How many times have I used it since then? Exactly once! Do I regret getting? Not for a second. It now occupies a what used to be an empty space on top of my fridge, next to an ice cream maker and a pop corn maker. Next on my list is a food-processor (a much more useful gadget than a waffle-iron I must say), I know I am fighting a losing battle, but I think i still have a few months or maybe even years before I succumb to that desire.
 
This is an adaptation of a "Belgian Waffle" recipe in Breakfast book by Williams-Sonoma. Since I changed a few things there and used Kefir as the main liquid ingredient, I don't think I can call them Belgian anymore, but regardless of what they are called, they turned out to be really good.

Yeast Buttermilk Waffles
 
For about 8-10 small waffles (the book says that it serves four but it barely served two in my opinion)

  • Flour - 1 cup
  • Sugar - 2 tablespoons
  • Salt - 1/4 teaspoon
  • Dry active yeast - 1/2 teaspoon
  • Kefir (or Buttermilk) - 1 cup
  • Butter, melted and still warm - 45 g (3 tablespoons)
  • Vanilla extract - 1/2 teaspoon
  • Eggs, separated - 2 large
  • Cream of tartar - a pinch (optional)
  • Oil for the waffle-iron
 
- In the evening, in a large bowl mix together the flour, sugar, salt and yeast.
- In a small pot warm the buttermilk (kefir) until it reaches 40C (a little bit warmer than body temperature if touched with a finger).
- Add the melted butter and vanilla extract to warm buttermilk and mix.
- Add the buttermilk mixture to the dry ingredients and mix well until a smooth batter forms.
- Cover the bowl with a plastic wrap and leave in a cool room for a night (not the fridge).
- In the morning, mix in the egg yolks into the batter.
- In a separate clean bowl whip the egg whites with a pinch of cream of tartar until soft shiny peaks form.
- Mix in the third of the whipped egg whites into the batter.
- Carefully fold in the rest of the whipped egg whites into the batter, trying not to deflate the egg whites too much.
- Generously oil the waffle-maker and cook the waffles according to the manufacturer's instructions.
- Serve with maple syrup.
 
February 22, 2010

Valentine's Day Weekend

To be honest I am not really a "hearts" person. I don't "ooh and ahh" when I see pinks and candles and teddy bears. I tried doing something romantic on Valentine's Day in the past but it never worked out. The romance felt forced and fake, so I gave up on doing anything special on that day: no gifts, no cards, no dinners, maybe just some flowers and that was it. Until this year.

This time around I just *knew* that I had to do something. It felt right and exciting and... (oh, gosh) romantic! So, I hunted down some pink heart confetti, pink candle holders and lots and lots of hearts. I cooked heart-shaped food, I put it in heart-shaped plates, I wore pink, I decorated everything in pink and hearts and by the end of the weekend I was really overdosed on hearts and romance. And although I don't want to see another heart in at least a year (or possibly more), it was fun and... (oh, that's embarrassing) romantic!

I'll post the recipes later if anyone is interested.

Tablesetting

Valentine's Day Weekend - table Valentine's Day Weekend


February 17, 2010

Cornbread Topped Chili Con Carne

I love chili, but surprisingly I only had it a few times in my life. I am not a chili aficionado or purist, I don't have a favourite recipe, I don't have any rules about only eating it the next day and/or cooking it in a certain way. It was my first time making chili and I loved it. It was savoury, spicy and, oh, so satisfying. At the beginning I felt like the cornbread topping was overpowering chili, but then after microwaving (yes, I do use microwave from time to time and I am not ashamed to admit it) one of the little pots, the cornbread got steamed a little bit and the combination of soft and a little bit bland cornbread soaked in flavourful chili was excellent. However, the topping can be omitted or even baked separately.

Cornbread Topped Chili Con Carne

recipe adapted from Nigella Lawson Feast

For about 8-10 servings

Chili

  • Onion - 2 medium
  • Garlic - 3 cloves
  • Olive oil - 1.5 tablespoons
  • Red chili flakes - 1 tablespoon (more or less depending on how spicy you want the final product to be)
  • Ground coriander - 1 teaspoon
  • Cardamom pods, crushed - 3
  • Red pepper - 1
  • Ground beef - 700 g
  • Chopped tomatoes - 1 can (540 ml)
  • Ketchup - 4 tablespoons
  • Tomato paste - 4 tablespoons
  • Water - 125 ml
  • Kidney beans - 1/2 can (200-250 ml)
  • Refried Beans with Chipotle - 2 cans (455 ml each can)
  • Cocoa powder - 1 tablespoon
  • Salt, pepper to taste


Cornbread

  • Salt - 3/4 teaspoons
  • Cornmeal - 325 g
  • All-purpose flour - 2 tablespoons
  • Baking powder - 3 teaspoons
  • Kefir or Buttermilk - 375 ml
  • Eggs - 2 
  • Maple syrup - 1 tablespoon
  • Vegetable oil - 2tablespoons 
  • Cheddar, grated - 75 g


For chili
- In a processor, finely mince the onion and garlic. Or mince it by hand.
- Heat the olive oil in a very large pan.
- Fry the onion and garlic until they begin to soften.
- Add the red chili flakes, ground coriander and crushed cardamom pods to the pan, stir.
- Deseed and finely dice the red pepper. Add to the pan.
- Break up the ground beef into the pan and brown it well. Keep turning it to separate while it browns.
- Add the chopped tomatoes, both types of bean, ketchup, tomato paste and water to the meat and onion mixture. Mix well.
- Bring the chili to boil, sprinkle the cocoa powder and stir.
- Reduce the heat and simmer it partially covered for  1.5 hours.
- Careful not to let the chili burn. The mixture has a lot of sugar from tomatoes and ketchup and it tends to burn a little.
- After 1.5 hours the chili can be cooled and frozen or kept in the fridge overnight.
- Preheat the oven to 220C (430F).
- If chili was chilled, then warm it on the stove.
- Pour the chili into a large ovenproof dish.
- Top the chili with cornbread and sprinkle with grated cheddar.
- Bake for 30 minutes or until the cornbread is risen and golden brown.
- Let cool for a few minutes, serve with sour cream, cilantro and avocado.


For cornbread
- Combine the salt, cornmeal, flour and baking powder in a bowl.
- In another large bowl, whisk together the buttermilk/kefir, eggs, maple syrup and vegetable oil.
- Pour the wet ingredients into the dry ingredients and stir to combine to get a wet batter.

Cornbread Topped Chili Con Carne

This is the Refried Beans that I used. I really liked them in the chili as they were mostly mashed but still some of the beans were whole. The texture worked really well for this recipe.

Refried Beans

 
Displaying articles 1 - 10 of 79 in total