This Pumpkin Cake is super quick and easy. It only has 5 ingredients and no butter or oil. It is also dairy-free! The batter comes together in under 10 minutes with only one bowl. Perfect cake for fall entertaining or just a delicious weeknight treat.

This post contains amazon affiliate links which means if you make a purchase after clicking one of those links, I will receive a small commission.
One of my favourite quick and easy cakes basically has 3 simple ingredients: eggs, sugar, flour, and then some kind of fruit. I’ve been experimenting with turning that simple recipe into different kinds of cakes over the past few years and with the weather getting cold and orange pumpkins popping up all around, it is time to make Easy and Quick Pumpkin Cake.
This cake has only 5 ingredients! It is delicious, spiced, soft, and super easy to make. You only need about 5-7 minutes and most of it is spent whipping up eggs with a mixer. There’s no oil and no butter in the recipe!

More quick and easy cake recipes:
- Quick and Easy Cake – this is the original and traditional basic recipe
- Easy 3-ingredient Cake Roll with Strawberry Jam – same recipe idea but turned into a cake roll
- 5-Ingredient Strawberry Cake – traditional basic recipe with a few variations
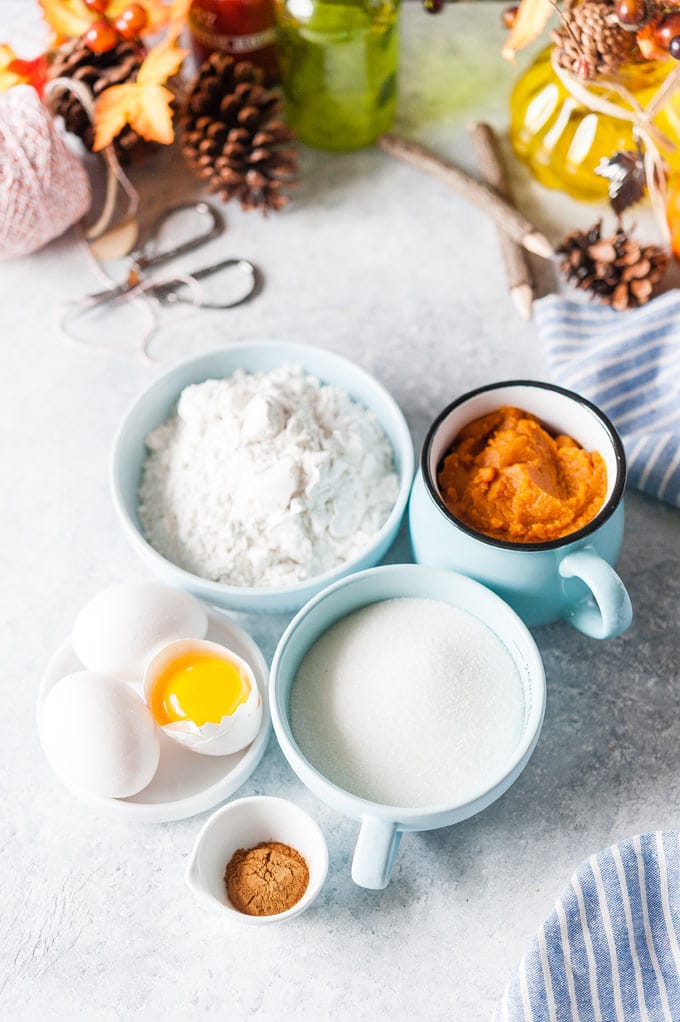
5 ingredients to make Pumpkin Cake
Ingredients for this cake recipe are surprisingly simple and as I mentioned earlier, there’s no butter or oil in the cake. It is also a dairy-free recipe!
- Eggs, sugar, flour – these three are the base
- Pumpkin puree, cinnamon (or pumpkin spice) – seasonal ingredients
Yes, there’s no baking powder in the recipe as whipped eggs provide enough aeration for the batter to rise. However, if you are a bit worried then you can definitely add one teaspoon of baking powder.
How to make this Quick and Easy Pumpkin Cake
I usually make the batter using a hand mixer but you can use a stationary KitchenAid mixer (this is the one I have) if you’d like. I just find that it is easier for me to use a hand mixer than to wash the big KitchenAid bowl.
There are two main points to consider when making this cake:
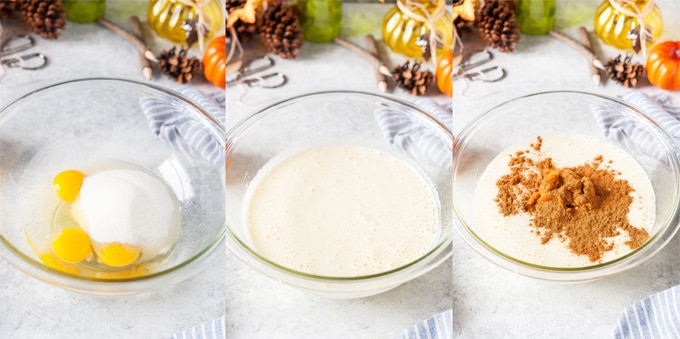
- Whip the eggs and sugar until they are tripled in volume. This will take about 3-5 minutes. The process of whipping the eggs is what allows you to omit using baking powder. If you are worried about the cake not rising, feel free to add one teaspoon of baking powder.
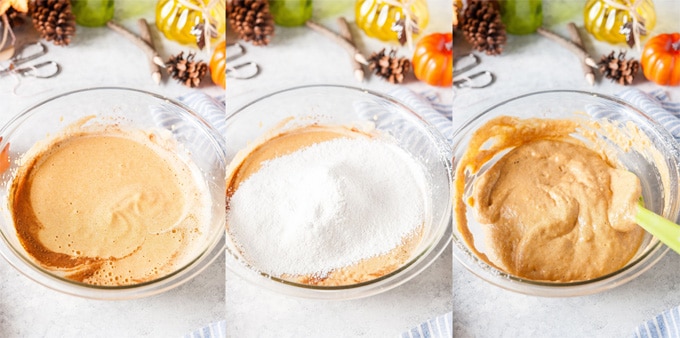
- Make sure to not deflate the eggs when adding pumpkin puree and flour. You want the batter to be as fluffy as possible. So, don’t mix vigorously, just fold gently.
Tips and variations for Pumpkin Cake
- Sugar
- Traditional recipe for this quick and easy cake uses 1 cup sugar. I usually reduce the amount as I find it too sweet.
- This particular recipe I tried with 3/4 cup and 2/3 cup sugar. Both worked for me but I prefer less sweet desserts.
- Depending on how sweet you like your cakes, use between 2/3 to 1 cup sugar.
- Vanilla
- Confession time: I am not a big fan of vanilla so I don’t always add it to my desserts.
- If you like vanilla in desserts, feel free to add 1/2 teaspoon (or more) of your favourite vanilla extract.
- Cinnamon
- I tried this Pumpkin Cake with both cinnamon and the same amount of pumpkin spice. I personally prefer cinnamon.
- Feel free to use the same amount of pumpkin spice instead of cinnamon if you’d like.
- Baking powder
- You really don’t need baking powder in this recipe. The photos and video are for the cake made without any baking powder.
- If you are worried that the cake will not rise, feel free to add 1 teaspoon of baking powder.
- Topping/mixings
- I like this cake very simple, just lightly dusted with icing sugar but you could add some toppings.
- You can add pecans or walnuts to the cake batter.
- You can also sprinkle the batter with a mixture of chopped nuts and coarse sugar before baking.
- Cake pan
- You can use a springform for an easy way to get the cake out or a regular cake pan.
- You can use 7 or 8 inches (this is the one I use) in diameter.
More pumpkin dessert recipes:
Not sure what to do with the leftover pumpkin puree? Try these delicious pumpkin desserts.
- Festive and Easy Pumpkin Coffee Cake with Cranberries
- Instant Pot No Knead Pumpkin Cinnamon Rolls
- Pumpkin Ricotta Cookies
- Pumpkin Cranberry Fudge
- Instant Pot Pumpkin Pudding Cake
5-ingredient Pumpkin Cake
Ingredients
- 3 large eggs
- 3/4 cup white sugar (see notes)
- 1 cup pumpkin puree
- 1.5 teaspoon cinnamon (or pumpkin spice)
- 1 cup flour (sifted)
- 1 teaspoon baking powder (optional)
Instructions
- Preheat the oven to 375F.
- In a large bowl, combine the eggs and sugar. Whip with a hand-held mixer for about 5 minutes until the mixture is tripled in volume, very light in colour, thick, and fluffy.
- Add the pumpkin puree and cinnamon and whipe for another minute or so until everything is well-combined.
- Sift the flour into the egg mixture and very gently and carefully fold the flour into the batter, making sure that you do not deflate the eggs. Once all the flour disappears, stop mixing.NOTE: If you choose to use baking powder, sift it together with the flour.
- Oil and flour an 8-inch cake pan. Pour the batter into the prepared pan.
- Bake for about 50 minutes or until a toothpic inserted in the middle of the cake comes out clean. It could take as little as 35 minutes to bake, depending on your oven, so check earlier.
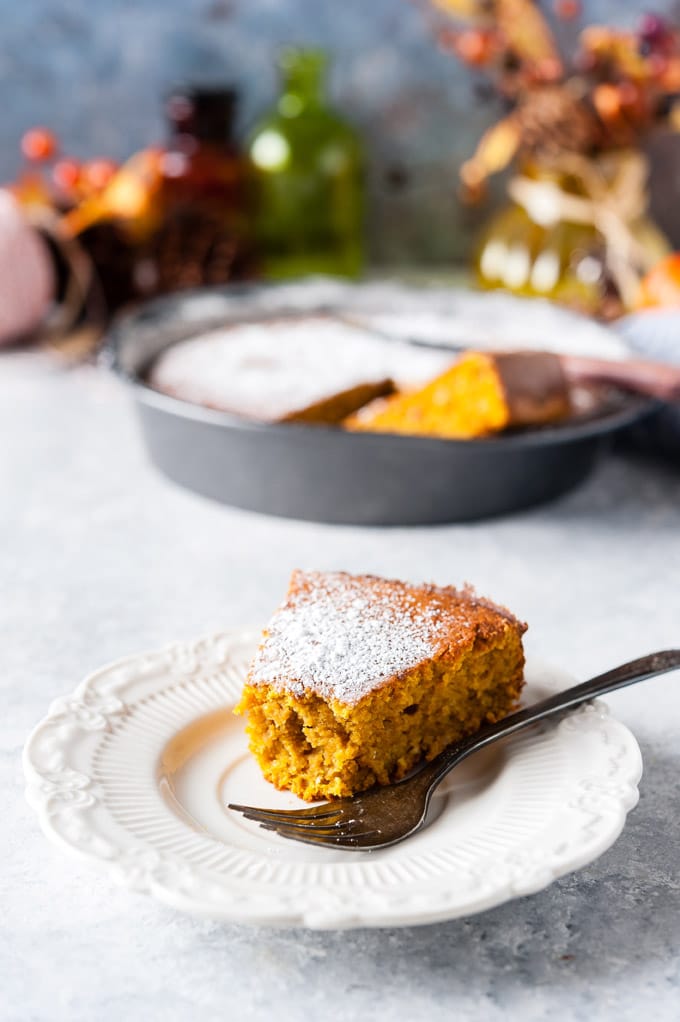
- Remove the cake from the oven, let cool, then slice and serve with a dusting of powdered sugar.
Video
Notes
Nutrition
Mention or tag @Imagelicious

Sarah Pettus says
Great recipe ! Thank you!
I was craving pumpkin. I did this recipe without the baking powder and I did add the 2/3 cup sugar. I set the oven at 375, then turned it down to 350 after putting it in. I baked it for 35 min and it came out perfect next time I will try less sugar !
Jill says
Love this cake . So did my family.. Yummy!!
Cassidy says
It was amazing if 13 and love baking
Jennifer Neville says
Does this cake freeze well?
Debbie says
Do you think I can make this with gluten free flour?
Julia says
I’ve never tried it with any gluten free flour so I don’t know
Caroly says
I used GF 1:1 Baking flour – turned out just fine! Might be a tad on the dry side, but I used coconut plain yogurt as a topping when served – perfect..my 3 year grandson approved! Made this 3 times last month at others’ request!
Carol says
My 5-year-old kid loves them too, he actually helped in making them. Guess it will be nice adding a little bit of pumpkin spice. Give this recipe a try! Thanks for sharing it!
Jenny says
Absolutely love this recipe! The cake turned out amazing! Moist, light and scrumptious. Most importantly, the sweetness
and pumpkin flavour was exactly what I expected yummy