Running low on time and ideas to make dessert for a celebratory dinner? A Dessert Board is a great way to provide a show-stopping end to a meal without much effort. Here’s how to make an Easy Dessert Board that will impress and satisfy everyone’s sweet tooth.
This post contains amazon affiliate links which means if you make a purchase after clicking one of those links, I will receive a small commission. As an Amazon Associate I earn from qualifying purchases.
Why create a Dessert Board?
Dessert Boards are a great way to share a variety of sweets. It is also ideal if you don’t have big quantities of cookies or candies.
Dessert boards are very beautiful and impressive. They can be assembled a few hours before dinner in just 10-15 minutes, making them great for entertaining.
One of the best things about sweet boards is that they can be made bigger to accommodate more people or smaller if it’s only a small family. It’s important especially now when big gatherings aren’t allowed. Sweet Boards are highly customisable.
Easy dessert board is also very affordable as you can utilise odds and ends of what you already have in your cupboards.
What do you need for a Dessert Board?
There are different kinds of dessert boards. Some are made with just candy, some are pastry-focused, some are centred around chocolates.
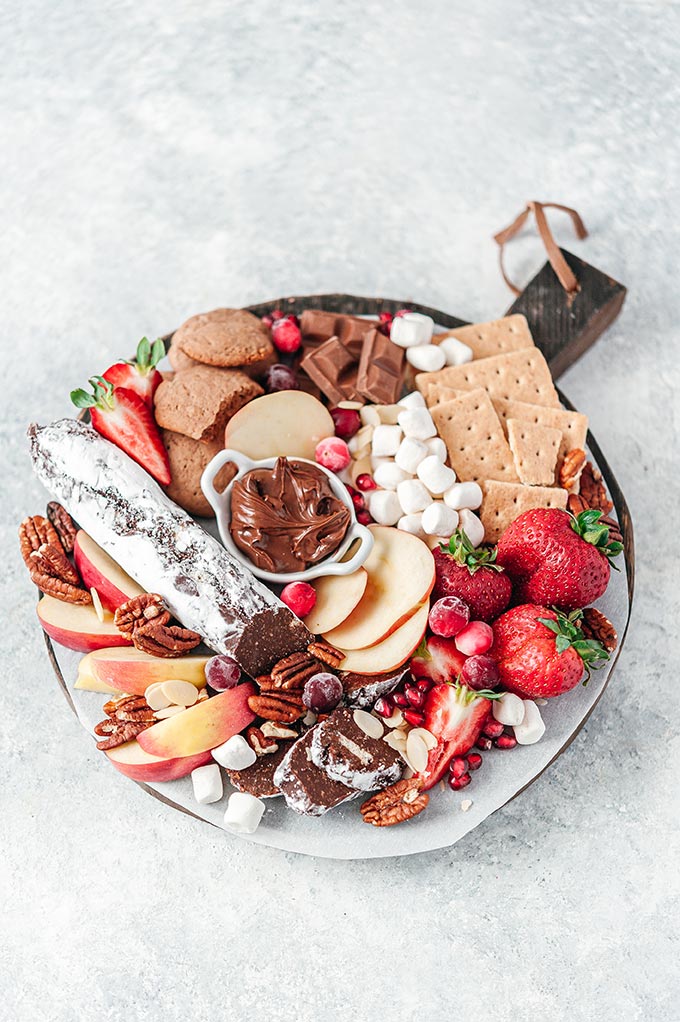
Each dessert board can be customised in any way you like. I prefer a more traditional and easier to assemble cookie, chocolate, and fruit boards.
What you want is to have a few different things that would appeal to different people. Some prefer fruit for dessert and some like chocolate only, some would prefer to try different cookies etc. You want to use different colours and shapes for visual appear.
You’ll need the following:
- Crispy/Crunchy: Use a few different kinds of cookies, preferably in different shape and colour. I even use graham crackers here. I’ve used plain crackers and pretzels before also.
- Chocolates: Add some chocolates in different flavours. Dark, milk, white. Add some chocolate wafers or chocolates with fruits and nuts.
- Fruit/berries: Add fruit like apples, strawberries, pears, persimmon, grapes, etc.
- Dip: Add a dip for the fruit and cookies. I use Nutella but you can use your favourite dessert dips, like Instant Pot Chocolate Dulce de Leche or nut butters.
- Fillers: Add small berries, nuts, pomegranate seeds, marshmallows or even herbs to fill up the space and add the variety and colour.
- Optional, focal dessert: I use Chocolate Salami as a focal point in this case. You could use your favourite fudge or bite-sized brownies.
[jumprope code=”zfHllNA0″ products=”top” displayformat=”blog-post” structureddata=”true”]
What to use for the board
First of all, you don’t need to use a board if you don’t have anything suitable. There are many things around the kitchen that can be used make a beautiful and delicious dessert presentation.
- Big cutting board. Wooden or marble work best but you can use plastic also. Round, square or rectangle work. I usually cover the boards with a piece of parchment paper to help with the cleanup
- Serving platter or large plate. You want the platter to be as flat as possible and not to be too ornamental as colours and shapes of the platter will clash with the desserts.
- Sheet pan. Baking sheets are great for serving desserts as they are flat and have a tiny edge that helps everything stay in easily. Just as with the boards, I like covering them in parchment paper.
How to assemble a Dessert Board
Just like with a cheese board or a charcuterie board, you want to balance everything and create different textures.
- If you are using some kind of a dessert, Chocolate Salami in this case, start with it and place it on the board as the main focal point.
- Add piles of cookies in different places on the board. Break up a few cookies in halves or quarters to add to the visual appeal.
- Add one or two piles of chocolates. Break up chocolate bar into small pieces or add unwrapped pieces.
- Add a few piles of fruit in empty spaces around the board.
- Add a bowl with the dip.
- Now, start adding little fillers to make sure that there are no empty space on the board. Use different colours and textures.

Tips for making a Sweet Board
- Use smaller board/plate/platter than you think you need. It’s better to have a board that is fully filled out with no spaces than a board that has lots of empty spots. Filled out board looks more beautiful.
- Have all the ingredients prepared in front of you so you can see the colours and textures.
- No need to have too much variety. Just 2-3 kinds of cookies are fine. If you are creating a board for more people, then you may want to have the same pile of cookies repeated more than once so that it’s easier to get to it from all the sides.
- Break up some of the cookies into smaller pieces, this will help people try more variety of things as opposed to just one or two big items.
- Make sure that all the fruit is well dried as you don’t want the moisture to get to the chocolates or the cookies.
- If you are using apples, you may want to rub a bit of lemon juice over the slices so that they don’t oxidise.
- Don’t forget to add utensils for cutting up fudge and forks or toothpicks for dipping fruit. You may want to add a small spoon for the dip also.
Cookie recipes to add to dessert boards:
Other desserts to add to dessert boards:
- Beet Butterscotch Fudge
- Pumpkin Cranberry Fudge
- Chocolate Salami (with Instant Pot hack)
- Gingerbread Truffles
- No Bake Chocolate Peanut Butter Brownies (vegan and gluten-free)
- Instant Pot Chocolate Caramel Sauce (Chocolate Dulce de Leche)
How to create an Easy Dessert Board
Ingredients
- Variety of cookies 2-3 kinds
- Different chocolates dark, white, milk, etc
- Variety of fruits apples, strawberries, grapes, persimmon, etc.
- Fruit dip Nutella, peanut butter, dulce de leche, etc
- Chocolate Salami
- Berries, nuts, marshmallows
Instructions
- Start by arranging piles of cookies on the board. Break a few pieces of cookies to add texture.
- Place the Chocolate Salami and a few slices on the board.
- Add piles of chocolates.
- Add piles of fruits where there are empty spaces.
- Add a bowl with the dip.
- Fill out the empty spaces with berries, pomegranet seeds, marshmallows, and nuts.
- Make sure that the whole board is covered and there are no empty spaces. Fill the empty spots with extra pieces of fruit or berries.
Video
Mention or tag @Imagelicious

Albertina says
I think I have to make it now. Your board recipes are really very delicious I have already tried your two board recipes and they were awesome. I will try this dessert board recipe now