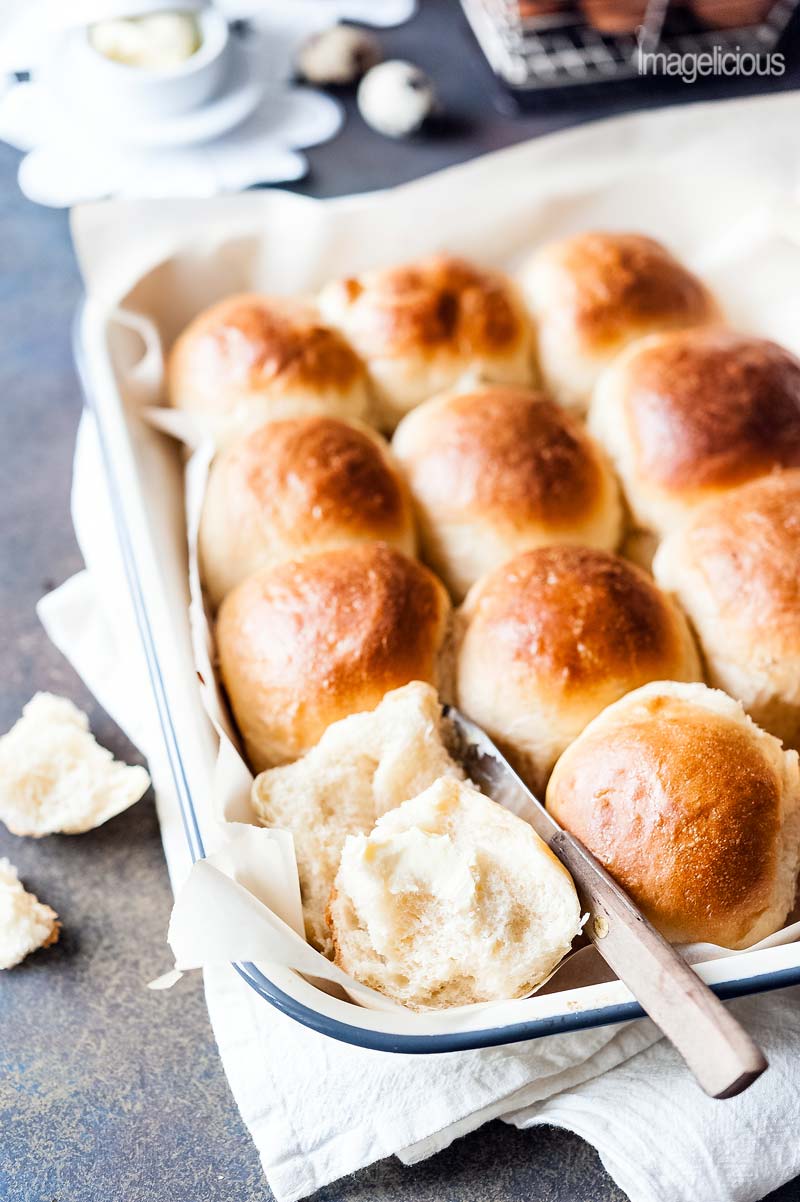
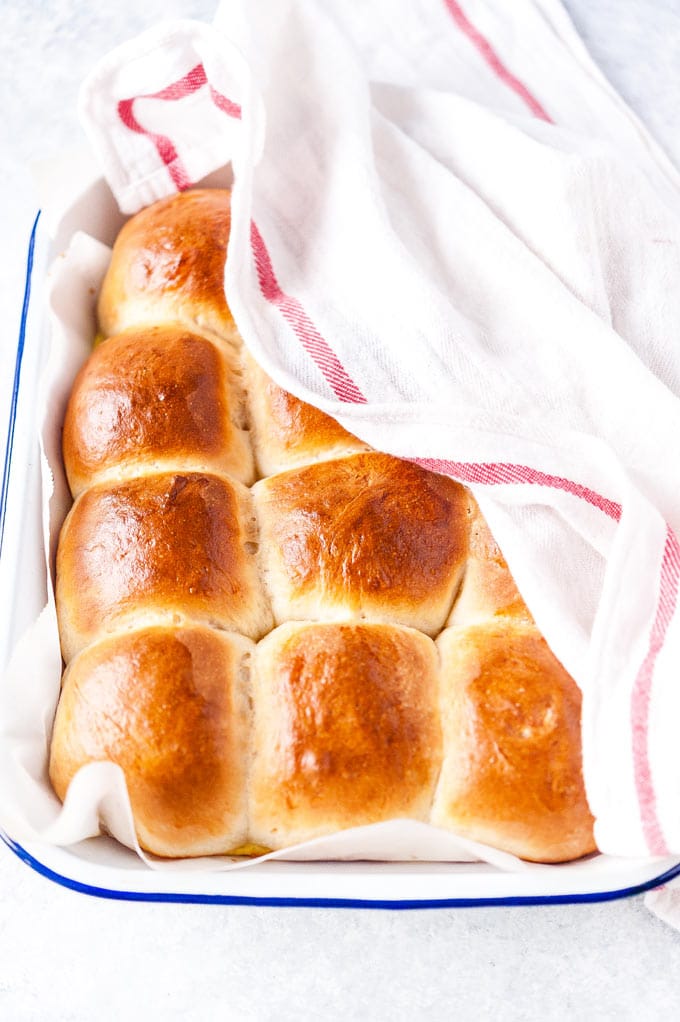
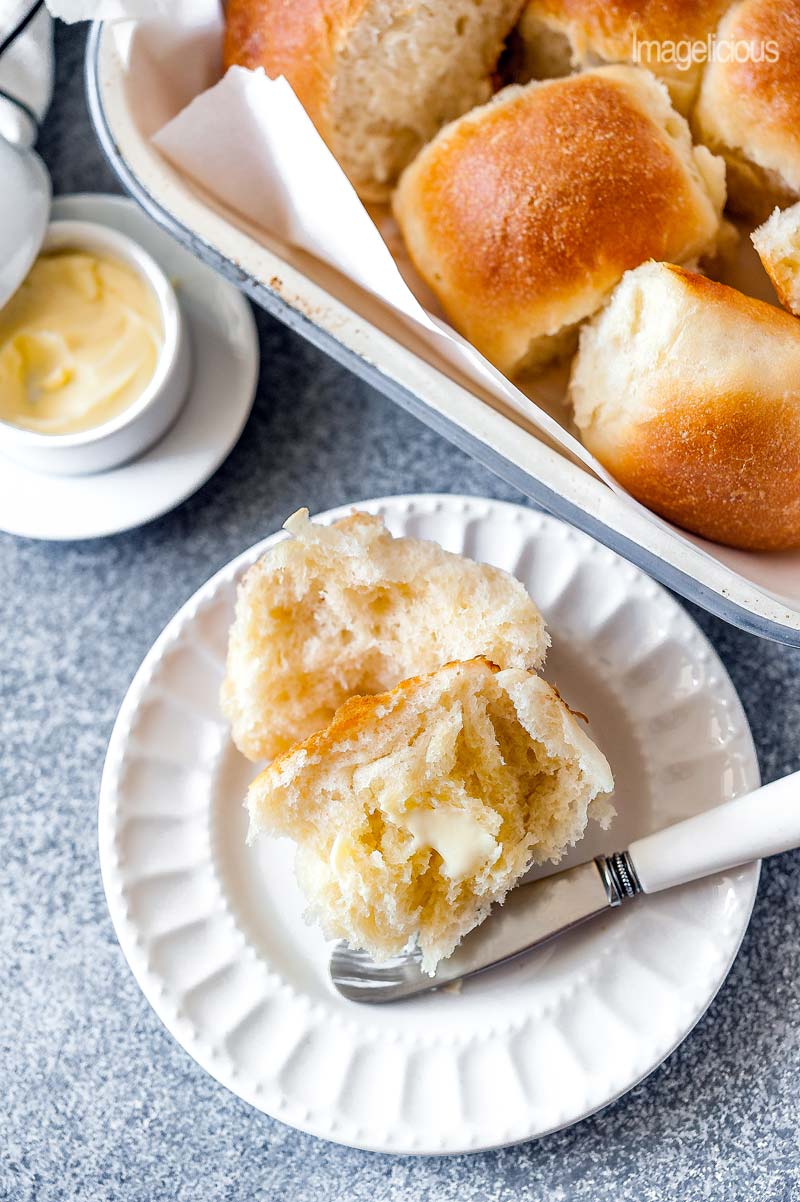
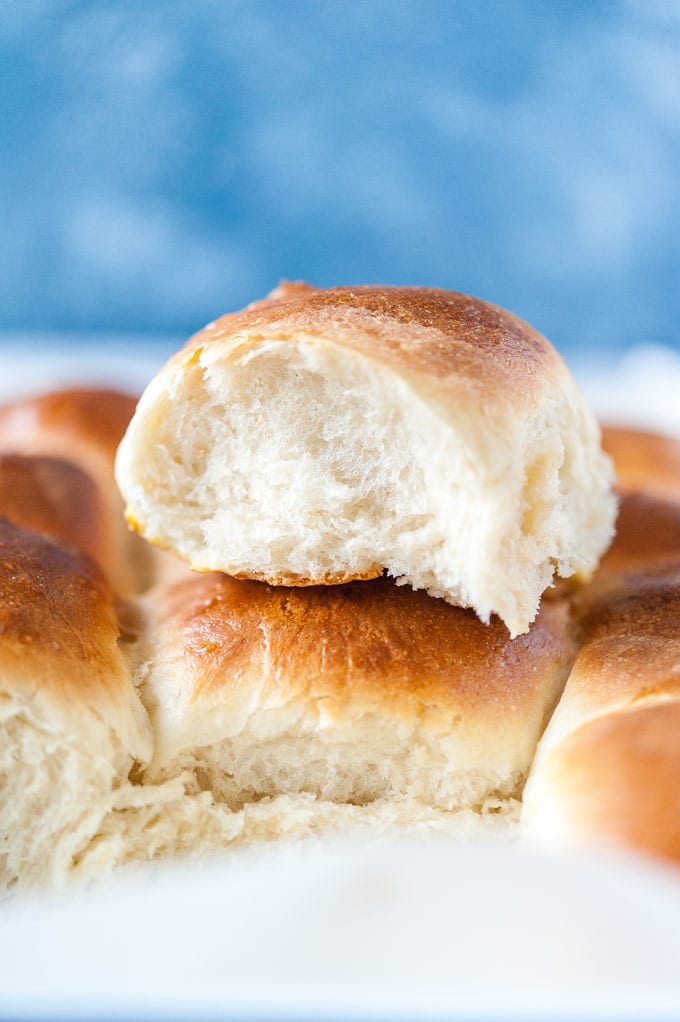
Instant Pot No Knead Dinner Rolls will be the star of any meal. They are feathery light, buttery, and soft. These bread rolls are perfect for sandwiches or an accompaniment to a roast. Easy to make without a mixer. They require no kneading. The dough is mixed and proofed right in electric pressure cooker.
This post contains amazon affiliate links which means if you make a purchase after clicking one of those links, I will receive a small commission. As an Amazon Associate I earn from qualifying purchases.
I’ve been using my Instant Pot for a few months and although I liked it a lot, I was not in love with this appliance after I bought it. Until I made these Instant Pot No Knead Dinner Rolls (three times many many times now) that is.
Making dough is not this nifty electric pressure cooker’s main (or even secondary or tertiary) function, yet Instant Pot Bread is exactly what made me a true convert and a true lover of this appliance.
If you are still on the fence about buying an Instant Pot, then read my article about 7 Things You Need To Know About Instant Pot and why you might not even want to buy it!!!
Now, I am absolutely in love with Instant Pot. I use it 3-4 times a week on average, often more, often multiple times a day. I actually have two Instant Pots! And sometimes they work alongside each other even!
Don’t forget to check many more of my Instant Pot Recipes and also my new site specifically dedicated to Instant Pot Recipes called Instantlicious.
This is going to be a long article with lots of tips, so if you don’t feel like scrolling, you can click –>Jump to Recipe<– and skip all the information.
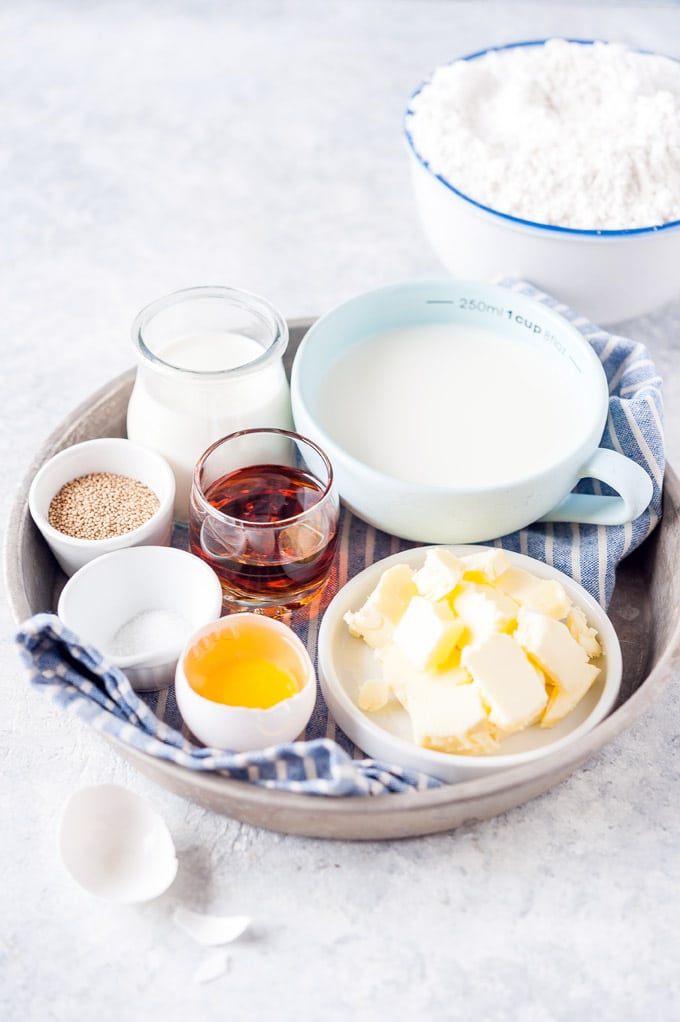
Ingredients to make Instant Pot No Knead Dinner Rolls
- Butter
- Milk
- Cream
- Maple syrup
- Active dry yeast
- Egg
- Salt
- Flour

How to make No Knead Dinner Rolls with Instant Pot
It’s very easy and it is a true one-pot recipe!
- In Instant Pot, melt the butter with milk and cream, add maple syrup, yeast, and let foam.
- Add the egg, salt, flour, mix until combined.
- Let rise on Yogurt function for 30-60 minutes.
- Once the dough is proofed, form the dinner rolls.
- Let them rise for 15-30 minutes in a pan.
- Bake.
Advantages of making Instant Pot No Knead Dinner Rolls
- Instant Pot Bread is a true one-pot recipe. Meaning that I don’t have to use a separate pot to melt butter or a small bowl to microwave milk. Everything is done in one pot – Instant Pot.
- There are many recipes online showing how to use a mixer to make the dough and then proof it in Instant Pot, however this particular recipe for Instant Pot No Knead Dinner Rolls requires no other equipment (except for the oven and a pan) to make these No Knead Dinner Rolls.
- I don’t ever knead bread by hand. I know lots of people swear that it’s therapeutical but I don’t have the patience for it. I usually let my KitchenAid mixer do all the work. It’s not difficult at all but it requires time as the flour is usually added a little bit at a time and then the kneading takes another 10 or so minutes, thus making the whole process at least a quarter of an hour.
- With this method for Instant Pot Bread, everything is mixed together in the Instant Pot (or another Electric Pressure Cooker that has a yogurt function) with a spoon with no kneading and left alone.
- When working with yeast, you need to let the dough rise to develop all that beautiful (and currently excoriated) gluten. The process of letting the dough rise usually takes a couple of hours and it needs to be done in warm place. Dough made in Instant Pot only takes one hour to rise (and often even just half an hour) using a Yogurt function.
- If your Instant Pot doesn’t have a Yogurt function and you would like to get another one, this is the exact model that I have. Alternatively, I have suggestions on how to let the dough rise without an Instant Pot below

How to proof dough if Instant Pot has no Yogurt button
You can most likely still use the recipe for these Instant Pot No Knead Dinner Rolls even if you don’t have an Instant Pot or another electric pressure cooker. Or if your Instant Pot doesn’t have a yogurt button. Just mix the bread dough with a spoon following the instructions, cover the bowl with plastic wrap and let it rise.
It will need more than one hour to rise, I would suggest leaving it be for about a couple of hours. Then follow the rest of the instructions in the recipe to bake these delicious No Knead Dinner Rolls.
How to proof dough without Instant Pot:
- Put a stopper into the kitchen sink drain and fill the sink with really hot water.
- Put a plastic covered bowl with the dough into the sink.
- Make sure that water is at the level of the dough in the bowl and refill as needed.
- I usually refill the sink with hot water once or twice during the rising process.
- Leave for about 2 hours, until the dough is risen and doubled in size.
The hot water will help the dough rise faster than just normal room temperature.
NOTE: You can use this method if your Instant Pot does not have a Yogurt button. If you’d like to get one that has a Yogurt button, this is the exact model that I have.
How much flour to use?
- 2+3/4 cups all-purpose flour will make perfect, soft, and delicious rolls. You can see the fluffy texture in the video. The rolls will also be easy to form.
- 3 cups all purpose flour is what I use in the summer when it’s humid.
Try different versions and decide which one you like best. I prefer 2+3/4 cups of flour since the dough is a bit softer.
IMPORTANT NOTE ABOUT THE FLOUR WEIGHT: I have done a weight test on my flour and 2+3/4 cup of flour consistently weigh 440g when I measure it. In ALL my tests over the past many years, 1 cup flour = 150-160g.
If you bake a lot, you’ll notice that it’s considerably more than what all the google research will tell you. I do not really know why that happens but I tried weighing the flour on different days and scooping it out with different measuring cups and the weight is consistent.
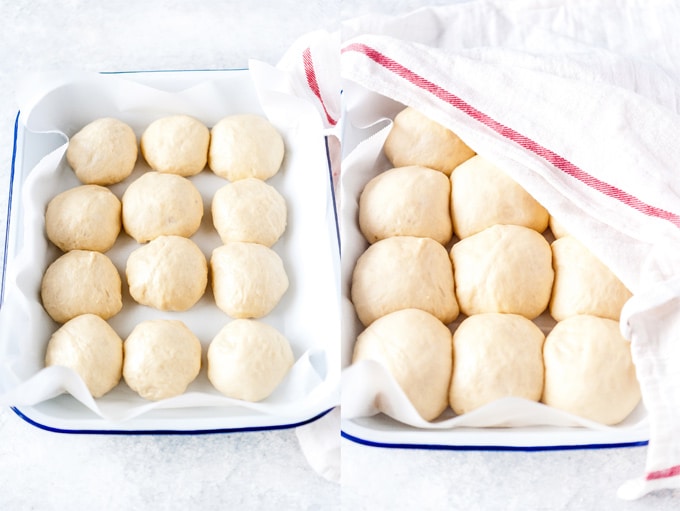
How to form Dinner Rolls
- Take a piece of dough and lightly knead it a few times just to make it pliable
- Flatten it slightly into a disk
- Now imagine that you are trying to wrap something in it, so gather all the edges around that “imaginary filling”. It’ll also look like it’s a ballon with just edges together.
- Place the “balloon” seem side down
- This technique will make sure that the top of the roll is smooth
TIP: Coating hands with vegetable oil means that the dough will not stick to your hands. Alternatively, you could use more flour to make the dough less sticky but it’ll be a bit messier.
Do you want more Instant Pot Recipes?
Join my Real Ingredients Instant Pot Recipes Facebook Group!!! It’s a fun and safe place to share your own Instant Pot recipes made with Real Ingredients.

What kind of substitutions can you make when baking these Instant Pot No Knead Dinner Rolls?
Remember, all these substitutions will change the recipe so the taste will be different from my original Instant Pot bread recipe.
- Maple Syrup
- You can use white or brown sugar instead of maple syrup.
- You can use honey.
- Can you omit any sweetener altogether? Yes and no. I would suggest adding at least half a teaspoon of sugar to the butter/milk mixture. Sugar helps the yeast develop and start working.
- Egg
- You can use 1 or 2 egg yolks instead of a whole egg. It’ll make the rolls taste a bit richer and more like brioche.
- You can omit the egg altogether. It’ll affect the taste a little bit but not much. No need to add any egg replacement or substitutions if you can’t have eggs.
- Half and half cream
- You can use 5% cream, 18% cream, or even 35% cream instead.
- If you don’t have any cream, you can use the equivalent amount of milk, however, cream not only adds flavour, it also has fat which affects the texture. So, using milk only will affect the texture of the rolls a little bit.
- Milk
- Can you use plant-based milk? I have not tried this specific recipe with plant-based milk myself. But I have a recipe for Vegan Instant Pot No Knead Hawaiian Rolls that use coconut milk and it works fine. I haven’t tried any other plant-based milks.
- You can use water instead of the milk (and cream). This will definitely affect the flavour and the texture of the Instant Pot No Knead Dinner Rolls but it’ll still work.
- Butter
- Most likely you could use margarine or other non-dairy butter if you are trying to make these rolls vegan but I personally haven’t tried. The flavour may change though.
- Yeast
- Some readers reported that the flavour of these rolls is very yeasty. I don’t find it too yeasty at all. I have also served these to many different people who also claimed that these Instant Pot No Knead Dinner Rolls tasted delicious. However, I have tried this recipe with just 2+3/4 teaspoons of yeast and it turned out fine. So, just to recap, you can use just 2+3/4 teaspoons of yeast if you desire. Most likely you could reduce it even further to 2+1/4 teaspoons (which is just one envelope) but I haven’t tried it myself.
Alternatives for brushing the dinner rolls with cream
I’ve been asked why I use cream to brush these Instant Pot No Knead Dinner Rolls. The answer is simple: I find that using cream is the easiest way of getting a nice golden crust on the rolls. Here are a few different options to brush the rolls before baking them:
- Cream as described in the recipe. It adds a nice milky flavour and makes the tops golden.
- Egg wash. Mix one egg very well with one tablespoon of water. It’s the most traditional way of brushing rolls. It makes a really beautiful glossy and golden crust.
- I personally rarely use this option because I find it a bit wasteful. In most cases there’s a lot of egg wash leftover and I hate throwing it away. Sometimes, I actually save the egg and water mixture and make myself a small omelet.
- NOTE: A culinary student commented on this recently and apparently egg wash can keep in the fridge for up to one week, so if you bake bread more than once a week then this might be a good option for you.
- Vegetable oil. You already have your hands covered in vegetable oil when forming the dinner rolls so just brush a bit extra on top.
- Melted butter. It will add an extra buttery flavour and a beautiful golden colour.
- I don’t have a microwave so melting one tablespoon of butter requires too much effort. Otherwise, I’d be all over this method!
TIP: Making Instant Pot Bread
Try using your favourite bread dough recipe and convert it to this Instant Pot Bread method
IMPORTANT NOTES and tips on working with yeast:
A few readers said that the Instant Pot No Knead Dinner Rolls were dense. They will not be dense if the yeast worked properly and the dough rose. You MUST make sure that when you add the yeast to the butter and milk mixture, it is NOT hot.
If the mixture is too hot then it will kill the yeast, so it won’t work and all you end up with would be just liquid and flour, which would make for really dense rolls.

Yeast just added to warm butter and milk mixture vs activated yeast that foamed after 5 minutes.
You MUST wait for the yeast to foam to make sure that it works, it will take about 5 minutes. You can see how it looks in the video and in the photos. If the yeast does not foam, then the rolls will not work.
You can use either Active Dry Yeast or Instant Dry Yeast. Technically, Instant Dry Yeast doesn’t need to be activated in warm liquid to foam but I always do that just to make sure that it is not too old and still works.
This is NOT a recipe for beginner bakers. You need to know how to make bread and understand the science behind the ingredients. Depending on your location and the weather (altitude and humidity), you might even need to add more flour or less flour. I will be happy to troubleshoot the recipe with you if you contact me.
On a personal note, I know this recipe WORKS. As I tested it extensively. I’ve tried it with more flour and less flour, more yeast and less yeast, with active yeast and instant yeast. I’ve made it with regular KitchenAid mixer and kneading many times. And I made it in my Instant Pot without kneading a couple of dozens times. IT WORKS!
It’s supposed to be sticky! It’s supposed to be messy! The texture of the dough is NOT the dough that you get from a can. It’s softer and stickier!!
The only time it did not work was when I killed the yeast by adding it into the milk/butter mixture which was too hot. I knew it wouldn’t work when the yeast did not foam.
IF IT’S HUMID AND SUMMER: During summer and high humidity I use 3 cups of flour and I bake these rolls for 20-25 minutes. In the colder and dryer months I use 2+3/4 cups of flour and bake for 15-20 minutes.

Dough just mixed in Instant Pot vs dough after 30 minutes of proofing using Yogurt function.
TIP: What to do if the dough didn’t rise
If the milk/butter mixture is too hot and the yeast didn’t foam then the dough will not work. Also, it could be the case that the yeast is too old. I buy yeast in a small jar, so it gets stale. You have a few options:
- Throw the mixture out and try again.
- Make flatbreads!
- NEW: If the yeast didn’t foam because the liquid was too hot, add more yeast and let it foam again. I personally tried this option once recently and it worked perfectly. I didn’t have to throw out butter/milk mixture.
How to make flatbreads
One time when the yeast didn’t foam, I still tried making the dough in hopes that it would miraculously rise. After one hour on a yogurt function it, obviously, did not rise but that one hour resting time made the resulting dough very pliable.
I separated the dough into four parts and rolled each piece of dough to about 1/4-1/3 inch thickness. I then brushed the pieces of dough with a bit of oil, added various toppings and baked at F425 for about 15-20 minutes. The resulting flatbreads were delicious!
I had a reader do the same when their yeast didn’t work and they raved about the results!
NOTES ABOUT YEAST: This particular recipe uses a lot of yeast, 1.5 tablespoons (4.5 teaspoons) to be exact. This is a personal preference. I love the smell and taste of yeast in bread. You CAN use 2+3/4 teaspoons of yeast, I tried that. You most likely can use 2+1/4 teaspoons of yeast, which is one envelope, but I haven’t tried this recipe with this amount of yeast personally.
I do NOT find that the flavour is unpleasant. None of my friends or family think so either and they request these dinner rolls often. However, it is a personal preference! You may not like this amount of yeast.
How to store No Knead Dinner Rolls
These No Knead Dinner Rolls are absolutely fluffy, soft, and feathery the day they are baked. They get more dense and less feathery after a day or so. The texture turns into a more normal, white bread.
I suggest eating them the day you bake as they are the most delicious then. Store covered with a kitchen towel on the counter for 1-2 days. After 2 days on the counter, transfer to an airtight container and keep in the fridge for another 5 days or so.
More No Knead Instant Pot Bread Recipes:
I love this method of making No Knead Dough in my Instant Pot and letting it rise on the Yogurt function so much that I created more recipes!
- Vegan Instant Pot No Knead Hawaiian Rolls
- Instant Pot No Knead Pumpkin Cinnamon Rolls
- Instant Pot No Knead Apple Cinnamon Pretzel Bites
- Instant Pot No Knead Carrot Bread Rolls
- Instant Pot No Knead Lemon Cheesecake Rolls
And on a totally different note, don’t forget to order my new cookbook, The Ultimate One-Pan Oven Cookbook, it came out on August 28, 2018!!!

Do you want more Instant Pot Recipes?
Join my Real Ingredients Instant Pot Recipes Facebook Group!!! It’s a fun and safe place to share your own Instant Pot recipes made with Real Ingredients.

Instant Pot No Knead Dinner Rolls
Ingredients
- 1/4 cup unsalted butter
- 3/4 cup milk
- 1/2 cup half and half cream
- 2 tablespoons maple syrup
- 1.5 tablespoons active dry yeast (IMPORTANT - see note)
- 1 large egg
- 2+ 3/4 cups all-purpose flour (IMPORTANT - see note)
- 1/2 teaspoon salt
- 1-2 tablespoons half and half cream for brushing the rolls
- vegetable oil for forming the rolls
Instructions
Make the dough
- Turn your Instant Pot on and press sauté button.
- Add the butter and 1/4 cup milk to the pot and wait for the butter to melt. Turn the Instant Pot sauté function off once the butter starts to melt. The pot will still be hot so everything will melt and heat up nicely.
- Add the remaining 1/2 cup milk and 1/2 half and half cream to the pot and mix.
- IMPORTANT: At this point you might need to wait 2-3 minutes to cool the mixture if the pot got too hot. The butter and milk mixture needs to be warm but not hot, so test it with your finger. If it's too hot then the yeast won't work.
- Add the maple syrup, yeast and mix.
- Wait for about 5 minutes to make sure that the yeast foams.
- Add the egg and mix it in with a spoon or a spatula.
- Add the flour and salt and mix everything together just until flour disappears.NOTE: if it's humid where you are, you might need to use more flour
- Close the lid of your Instant Pot.
- Press the Yogurt button and choose time of 1 hour (if you'd like, you can even do 30 minutes, just check to make sure that the dough actually rose after that time). You need a model of Instant Pot that has this button. This is the one I use.
- After one hour (or half hour) take the Instant Pot lid off. The dough should have at least doubled in size. It will be light and spongy. Mix it with a dough scraper or your hands.
Make the Instant Pot No Knead Dinner Rolls
- Preheat the oven to 425F.
- While the oven is preheating, form the rolls.
- Line a 13x9" pan with parchment paper for easy cleanup.
- Lightly coat your hands in vegetable oil, it will help with the dough not sticking to your hands.
- Take a little bit of dough and flatten it slightly, now imagine you are wrapping something inside that dough by stretching all the edges around it like a balloon. This will form a nice ball with a "seam" at the bottom.
- Place the ball seam side down onto the prepared pan.
- Repeat with the rest of the dough making 12 Dinner Rolls. Alternatively, you could make 16 smaller Dinner Rolls.
- Cover the pan with a clean kitchen towel and leave for 30 minutes (it may take even less time, check after 15 minutes, they should almost double) for the rolls to rise.
- After 30 minutes, brush the rolls with a little bit of half and half cream.
- Bake in the fully preheated oven for 15-20 minutes until the rolls get golden brown.NOTE: if it's humid where you are, you might need to bake for 20-25 minutes.
Video
Notes
Nutrition
Mention or tag @Imagelicious
Blogs evolve. Food blogs evolve particularly strangely. Blogs by definition are sites that contain personal musings, ideas, thoughts.
Food blogs are currently under attacks by all those people who do not understand what a blog is and what it actually takes to write a blog post.
When I update my older posts, I often remove my old thoughts, my old words, my old memories. But hate losing them.
So, here they are. The words from a few years ago when I wrote this post originally.
From March 28, 2018
I was going to wax poetic about food and nostalgic memories that are often invoked by it. About returning to my childhood, to the time of innocence when every taste, every flavour is so much more intense and bright.
I was going to talk about dinners at the cottage with my grandparents, leisurely weekend breakfasts with my mom, the excitement of waiting for my favourite cake to be cut on my birthday.
I was going to talk about the smells and the time machine that they are. The smell of a pie baking in the oven transporting me momentarily to the long-forgetten time three decades ago. Or the sizzle of the onion hitting the foaming butter and reminding me of my wedding day. Or that intoxicating yeasty aroma of the most beautiful and soft bread that just came out of the oven and reminded me of all those failed attempts to make bread in my 20s.
I was going to write so much but then I realized that no matter how much I wanted to make this post into a story, there really was no story. Sometimes you just have to let the food speak for itself, take the centre stage, and let it shine.
There will be plenty of stories, plenty more memories that I will eventually share. But today, the story is simple. It’s the story of delicious, amazing, and a little bit magical Instant Pot No Knead Dinner Rolls.

Kat says
I just tried this recipe today and it was delightful. The bread was super soft with a delicious flavor. This is definitely a keeper!
Daniel Lapine says
if your instapot doesn’t have a yogurt setting, but does have “sous vide” (like the instapot duo crisp), you can use the sous vide setting at 113F to get the same results for the duration listed here.
More details here- https://foodisafourletterword.com/recipe/instant-pot-duo-crisp-yogurt-recipe/https://foodisafourletterword.com/recipe/instant-pot-duo-crisp-yogurt-recipe/
*not affiliated with anyone, just thought this would be useful for others as well
Betsy says
Directions were perfect, and the rolls were delicious. The pictures helped with the steps throughout the recipe. This was my first time using the yogurt setting!
puja says
great recipe… havenly bread.. made this on thanksgiving my family loves it.. thank you so much for sharing the recipe.. i added honey instead of maple syrup.. and add 1 tbsp of yeast still turned out great..
Mary S. says
Do these freeze well?
Katrina says
My only problem was in the baking, I started with 15 minutes and the rolls were barely golden so I baked another 8 minutes and they were golden brown and hard on the outside, a little soft inside. What did I do wrong?? Any tips would be appreciated.
Julia says
Top being golden really depends on your oven and what you brush the buns with. Best thing for golden would be egg wash. I love using cream because it’s easier but also it works in combination with oil. The buns are usually oiled because I use oiled hands to shape them, so there’s a bit of oil residue on them. Also, the colour depends on your oven. Sometimes mine also turn out really pale. And them being hard is most likely because they were overbaked unfortunately.
Christine B says
Hello! My tools turned out more like a biscuit. Can you guess what I may have done wrong? The instant pot did its job perfectly, so this was something I did wrong after that. I’m wondering if it would have been in forming the bums? Should there be an actual pocket of air? I am a beginning Baker and was determined to prove that caveat wrong! 😂
Missy says
Help Please! I do not have the yogurt feature on my Instant Pot. I have the 8 quart size , LUX 80.
Nomzterpawz says
Can you add weight (instead of teaspoons/tablespoons/cups) to your recipe please? I’m reading through the comments and I want to avoid the flour issue. I saw your note about your amount of flour is typically 440g – I would like to know the weight for the other ingredients (eg yeast) as well. (As you can appreciate I’m sure as a baker, weight is more accurate and has less room for interpretation for baking. How your flour is stored and scooped can have an impact on weight. Eg did you loosen up the flour before measuring?) Thank you in advance.
Julia says
At this point I am unable to do so. As you understand, the current situation is difficult so I am not able to measure out the ingredients as I am trying to save them. Once the world goes back to normal, I’ll try to measure them. However, all the other measurements (except for the flour) are standard and you could find the info online.
Patti says
Do you think this recipe could be made into clover leaf rolls, the kind that you roll the dough into balls and put 3 balls in each muffin tin?
Julia says
I haven’t tried but I think yes
Stephanie says
Can you use something other than maple sysyrup
Julia says
Yes. Just like I said in the recipe post in the section about all the substitutions, you can use sugar or honey.
Soye says
What a great recipe! So easy and simple, yet delicious!
I doubled the recipe (I have a 8-quart IP) and got 24 large rolls. I only had 1% milk so I used it for all the liquid ingredients (milk and cream). I used only 2Tbsp of yeast instead of 3Tbsp, and it worked just fine. I also added garlic powder and Italian seasoning to flour for extra flavor and sprinkled Parmesan cheese on top right before baking.
Only problem I had was that the dough was very wet and sticky. It was challenging to shape into rolls. I basically had to plop them on the sheet. I used 5+1/2 cups of flour (a double of the original 2+3/4 cups), but adding another 1/3 to 1/2 cup would probably work better.
I might have over-proofed the dough, even though I kept it in yogurt setting for exactly 1 hour. Next time I’m going to set it for 30 min. and add more time if needed.
Definitely need some experimenting to make it fully mine, but that’s where all the fun of baking comes from, right? 🙂
Thank you so much for the great recipe!!
Tanya s says
I think this recipe should call for sugar not salt. I tried proofing my yeast 2x with salt as per recipe and it did t not work, but I decided to keep following the recipe and see if it would all work out in the end. It didn’t 😢 Can you change this recipe to be sugar not salt?
Julia says
There’s nowhere in this recipe where I say to proof yeast with salt. You are correct, salt prohibits yeast to develop, so that’s why you always use some kind of sweetener to feed the yeast. In this recipe I specifically say to use maple syrup and yeast together and let it bubble/foam. Only once the yeast has foamed, flour and salt are added. Salt is a totally normal ingredient in bread dough.
Tanya s says
Oh god I am so sorry, I put this on the wrong website, sorry, I didn’t even do your recipe, I was looking to do yours next time, please delete my comment if you can
Julia says
Phew 🙂 Ok. Good 🙂 I’m glad it was a misunderstanding 🙂
Wendy says
Ok. My yeast didn’t foam so I used your tips and made the flatbread. It was delicious!!! It was in the IP 90 minutes instead of the 60 and still turned out fine. Now I have my little assorted flavored flatbread to snack on with minimal effort. Still want to try the rolls though. Thanks for the recipe.
Julia says
Oh, too bad about the yeast. It was either old or the temperature was too hot. But I’m so glad you got to make those flatbreads- so delicious!!
Claudia says
My dough wasn’t overly sticky. And it looked like yours in the video, I have no problem shaping them….. But they spread out in the oven….:( What do you think? Add more flour next time?
Julia says
I would add a bit flour like you said. Mine also spread but I make them in a roasting pan so they spread against each other and go up.
Newsitian says
I used the lesser amount of flour and my rolls spread out like pancakes. There was no way I could roll them in my hands so I had to plop them on the pan like drop biscuits. I’ll definitely try more flour, because I am undeterred!
Julia says
Sorry that happened to you. Yes, the amount of flour for some reason works for me (i’ve made these rolls many times over) but not for other people. Try to use more flour next time.
Niki says
I love the convenience and results of this recipe! Is it possible to also do the cooking step in the instant pot?
Julia says
You can bake in Instant Pot but it may not work for your particular model and the buns will not be as fluffy. But you can and I’ve done that. There’s a trick to it and I have detailed instructions on how to do it at this link: https://www.imagelicious.com/blog/instant-pot-cornbread
Karen says
Help I have my dough in the insta pot on yougurt setting but I just realized that the yougurt only has a setting of 12 min. Do I have to reset my timer 5 times?
Thanks Karen Butterfield
Julia says
Check you instructions. Yogurt is usually made in 8-10 hours so it goes in 30 min increments on mine. It should do more than 12 minutes
Karen says
Yes I realised that it was set at 12 hours lol.
I’m an idoit lol
Julia says
Not an idiot at all 🙂 don’t say that! If you’ve never used that function before then it was a very logical assumption!
Ghislaine says
Bonjour,
J’habite en France, et j’ai fais l’acquisition d’un Instant Pot sur Amazon, je dois le recevoir cette semaine.
En regardant les recettes pour l’IP sur le net je suis tombée sur votre recette de pains au lait sans pétrir, je ne connaissais pas cette méthode. Je me suis empressée de la faire dans mon multicuiseur qui a une fonction yaourt et ben résultat bluffant, j’adore …. et tous le monde a aimé
Par contre j’ai pas trouvé la vidéo de la recette
PF says
La video de la recette est au dessus de la section du “Nutrition Facts.”
(Pardonez my poor French.)
Cindy says
Great recipe can’t wait to make the rolls I to was not thrilled with having an instant pot but the more I use it the more I like it thx
CMS says
I made this over the weekend and the texture came out quite good. My only complaint is that the rolls are a little bland. Maybe if I added a little more salt… Otherwise, I’m impressed with this recipe and the ease of making these rolls.
Julia says
I’m glad they turned out well. I do use less salt than most people so feel free to adjust and add more 🙂
Bob says
What I love about my instapot. Rice, yogurt and now yeast rolls. The rolls turned out great.
Julia says
I am really glad they did!
D says
Fantastic recipe, thank you! I’ve baked lots of no-knead bread but this is my first attempt at buns and they turned out great. Keeper for sure!
Julia says
Thank you so much for your kind words!
Kelly says
This recipe is wonderful! I added a little extra flour because I was using my KitchenAid and I used buttermilk instead of half and half. My rolls turned out absolutely perfect. Thank you!
Julia says
I’m so glad you liked the recipe! Thank you for letting me know. And I love using buttermilk for bread!
Kelli says
After the first rise in the Instant Pot my dough was a good consistency but didn’t rise very much. And I made sure it foamed before adding the other ingredients. Should I do another round of rising before making rolls or can I add more yeast at this late stage?
Julia says
Not rising if it foamed could be because the temperature wasn’t warm enough… I would try and do another round of rising. I don’t think you can add more yeast at this point… I realize I responded to this comment 2 hours later so my response is too late most likely
Kasey says
How much is all the ingredients?
Julia says
What do you mean? The price depends on the store where you buy everything
Deanna says
I tested out this recipe with my minimal experience baking and it turned out! I used the proof setting on my Pampered Chef quick cooker… I think it would have worked great but I didn’t trust it so I did 30min checked and put it back on. Next time I think I will trust that it will be okay. My bread turned out to be quite dense I’m thinking that might be why. Or my rolls were too large. Thanks for sharing this recipe!
Kat says
I have recently gotten my first instapot and was exited to find a roll recipe for it. I made it for the first time a few weeks ago with wonderful results, they came out perfect! When I made them again today, I had the issue several others have posted about with the dough rising, but being very wet and sticky and I couldn’t form the rolls like I did last time. I live in Vermont, so humidity this time of year isn’t an issue. Wondering if this result could be from turning the saute function off too early after melting the butter. Last time I had to wait quite a while for the butter and milk to cool before I added the yeast, so his time I only had the saute function on until the butter just started to melt, then switched it off. Could this be why I had such a different result?
Julia says
I’m glad they turned out the first time! I am not sure why you had an issue the second time.
I do not thing the sauté function would be an issue. Turning it off early would be the same effect as letting the mixture cool. Did you use exactly the same ingredients? Maybe it’s a different brand of flour?
Lisa Marie says
I had a similar problem that Donna had. After I formed the balls they quickly started to flatten. Then after the 2nd rise when I was brushing them with cream they appeared to be flattening again. They tasted great… just had the texture of focaccia bread.
Lisa Marie says
Julia…. is the reason the texture was like focaccia bread because I had too much or too little flour? I want to try again… just not sure which direction to go in. .
Julia says
Hello Lisa Marie – since they started flattening, I would assume there was not enough flour. Although I use very little flour and the dough is quite sticky, yet they don’t usually flatten. I honestly don’t know. I would try adding a bit more flour next time. OR, you could make the dough in the KitchenAid Mixer, adding flour as you go until your desired texture and then let your Instant Pot help with proofing the dough. It’ll still be faster than without Instant Pot.
Nancy says
Great recipe and I am sure you put lots of work into it. I will be buying your cookbook as I am sure it’s worth it.
Donna says
I made these and I don’t think there was enough flour. The dough was very sloppy (like a very very thick pancake batter. I din’t weight my flour but will the next time I make them. They smell great. But I added more flour after taking them out of the IP. I would say about another cup and kneaded it into the dough til I could form a ball that didn’t flatten. Trial and error until I find the right measurement. Now the taste test.
Julia says
Thanks for letting me know. I really don’t understand why there’s such an issue with the flour for some people. I have made this recipe more than a dozen times now and it comes out fine with no issues. It’s just strange.
Lauren Wolf says
I made these but they turned out more like biscuits. (Taste ones, but not fluffy rolls like I hoped). I used same amount of yeast as you and it did foam. I also used the yolks instead of whole egg. Used 2 3/4 cups flour. I’m not a baker, so just looking for advice on how to get them to be fluffier. I’m in Austin and it’s hot and pretty dry right now.
Julia says
Thank you for your message. I’m sorry they didn’t work… it took me about a year of tries before I was able to make real bread back in the day when I started learning to cook and bake. I kept making something hard and dense. It turned out I was adding too much flour… so… here are a couple of things I would do in your case. If you have a KitchenAid mixer, I would try to make the same dough with it. I know, the rolls won’t be No Knead anymore but bear with me… what you need to do is actually figure out how much flour he dough needs… for example, for me, most recipes that I see have too much flour. What the mixer will do, it’ll allow you to add the flour little by little. Start with 2 cups and Knead with a hook for a few minutes, then add another 1/4 cup and Knead… you are looking for the dough to start gather around the hook, be clear off the bowl sides and be soft, yet a bit sticky. If it’s still not clearing the sides of the bowl, then keep adding flour 1-2 tbsp at a time… this way you’ll figure out how much flour the recipe actually needs. Once the dough is done, you can transfer to IP and proceed. The next time, you’d be able to use those same flour measurements but without a mixer…. I am guessing about there being too much flour just because you described the result as biscuits…
Lauren Wolf says
Thank you for this advice!
Josephene Kealey says
Hi Julia, I am really looking forward to trying this recipe. I have a couple of questions:
1. Can I double this recipe?
2. Will the buns freeze well?
Thank you!
Julia says
Hello Josephene, I haven’t tried doubling the recipe or freezing the buns myself.
On freezing, I’m going to guess that you can freeze them. They might not be as soft after but still delicious.
As for doubling the recipe, unless you are pretty good with baking bread and would know by feel how the no Knead dough is supposed to be before rising, I wouldn’t double. The thing is that I find that with baking doubling doesn’t always work, sometimes you need more flour or less flour. If you feel confident that you can figure out how the dough is supposed to look like then I’d try it by using 1.5 amount of flour first and then adding more to get to the proper consistency. You might need less the double the amount of flour or a bit more. Also, perhaps don’t double the amount of yeast. I like the flavour of yeast in my rolls but even with doubling the flour/liquid, you don’t need to double the yeast as there’s already enough.
Josephene says
This is very helpful. Thank you for the detailed reply!
Nazia says
. Should I spoon the flour into the cup used to measure to air it out? Any way you can give me me a weight measurement for the amount of flour you use ? I don’t want to make mine too dense
Julia says
I personally just scoop with my measuring cup and use a knife to level off the top part. I can do a weight measurements but only tomorrow
Julia says
Hello, I weighed my flour and 2 3/4 cups of flour are about 460g for me which is a lot more than if you google the weights. When I measure the flour, 1 cup is consistently 165-170g whereas google says that 1 cup should be between 125-135 g
JoAnne says
I wonder if this is why so many people are having problems with the dough being sticky.
Julia says
Maybe… well, the dough is pretty sticky and sticky isn’t necessarily bad. But maybe that’s the reason… funny thing is that I now often measure the flour and weigh after just to check and it’s very consistently weighs like this. But the recipes still work fine… recipes for cakes, cookies etc. Not even my recipes but recipes from other cookbooks… weird
Danielle says
My first time baking bread and these turned out pretty good! I made them vegan – used plant based butter and milk and omitted the egg. Also used coconut sugar instead of maple syrup. I would make it again but add a bit more flour since it was super sticky. What other kinds of flours do you think would work in this recipe? Whole wheat? Almond flour? A blend of these?
Julia says
I am glad you liked them! And thank you for letting me know that the plant-based milk works with this recipe. I don’t think you could use almond flour since it has no gluten, it’s just ground nuts and you need yeast to work properly. You might be able to use whole wheat but I wouldn’t use all whole wheat. Maybe 2/3 regular flour and 1/3 whole wheat? But I actually haven’t tried using it so I can’t vouch for the results
Emilie says
I meant to choose 5 stars on my above post! oops.
Julia says
Thank you for the stars 🙂
Emilie says
Thank you for sharing this lovely recipe! I made a roast chicken dinner while the dough was rising and then was able to turn the oven up to bake the buns as I let the chicken rest and prepared all the side dishes for serving. The buns are yeasty tasting which I love. I saw your suggestion to use 1tablespoon for those who don’t like that flavour. I happen to love it though 🙂
I followed your recipe exactly as followed and the buns were puffy little soft clouds of deliciousness. I’m going to have one for dessert with jam.
Julia says
I am so glad you made these rolls and you liked them! Thank you so much for taking your time to write a comment. And I am also glad you liked the yeasty taste. Lots of people complained but the thing is – people have different tastes. I, for example, use very little salt and my recipes and can’t eat a lot of other people’s foods because of that. And it doesn’t mean that other people’s food is bad, it’s just not to my liking.
Ruth Leach says
PLease don’t take the post down. I’m going to try these today. I feel like it’s a challenge now 🙂
What a brilliant idea to use the IP for the rising.
Connie says
I made these twice and both times it was a bust! They are super yeasty and taste very strange because of that. 😢
Julia says
I’m sorry you didn’t like the flavour. Unfortunately everyone has different tastes. You can reduce the yeast to 1 tablespoon and it’ll still work. We just prefer this taste in my family
Marlee says
You can make bread in an Instant Pot?! Trying this out!
Sasha @ Eat Love Eat says
These dinner rolls look so light and fluffy! I don’t have an instant pot but I love the idea of making bread in there! Your recipe looks great!
Marilyn says
Can you use bread flour in this recipe? I am trying the recipe today. Anxious to see how it tastes. Thanks
Julia says
My guess would be yes but I personally haven’t tried using bread flour. Let me know if it works!
Amanda says
What a great alternate use for the yogurt function on the Instant Pot! The rolls look like they have such a great texture, and are so fluffy. Even better, they sound so easy to make. I’ve been loving exploring all the different uses for the IP and can’t wait to give this bread try!
Sarah says
So.. I don’t have an Instant Pot, but I do have a yogurt maker. Do you think I could let my dough rise for the same amount of time in the yogurt maker? (If you have no clue, that is totally fine LOL! I’ll just have to try it out!)
Emilie says
I think that would work. It’s just about the nice steady temperature to rise the dough.
Phil says
I couldn’t possibly be more of a beginner when it comes to cooking breads, and this turned out AMAZING! They were so good nobody believed *I* made them lol
I read and re-read the yeast instructions since the author stressed its importance, and the only change was swapping brown sugar for the syrup.
It’s the first time I’ve ever used the yogurt setting in two years. I didn’t even know my IP model had one.
THANK YOU!
Julia says
Hooray!!! I’m so glad the recipe worked for you! I’ve been getting discouraged reading comments from other readers who said the recipe didn’t work. I even contemplated removing this post. But I’ve made the rolls so many times with great results. So, I’m extremely happy you liked them!!
Emilie says
whew! Glad you didn’t take the post down!
Andrea says
I had to take the pot off the element for it to finally cool down enough to add yeast to milk. I made two mistakes after that. Dough did rise beutifully but it was so sticky it completely stuck to my hands so much that even though I coated my hands in veggie oil I still had to add flour just to deal with it. I also messed up by having the oven on too hot. I was doing too many things and had it at 475 and they were done a full 10 min before timer, but that made them too dense. I will try again with right temp but any tricks other than coating hands with veggie oil for dealing with the sticky flou?
Julia says
Hmmm… I would suggest adding 1/4 cup extra flour to the the dough before the rise. Hopefully it will make the dough less sticky for you. Liquid to flour ratio is often tricky as it depends on the humidity also. The ratio in this recipe works for where I live and as I mentioned it even works with less flour but for you it might need more flour… so, I’d try with extra 1/4cup. I hope it works the next time
Amy Nash says
These rolls looks so fluffy and yummy! I would seriously eat them for my dessert! And thank you so much for all the helpful substitution information – it seems like I’m always having to figure out how to substitute something or other!
Tina says
I laughed at your story conundrum. That’s how I feel sometimes. Thanks for the laugh and this recipe, I don’t have an instapot but I am living vicariously through yours.
Kathy McDaniel says
There is nothing like homemade bread and the aromas of making it at home. Making these soft and amazing rolls in the instant pot is genius! I will have to try this for sure. Love how delicious they look.
Jac says
Made these the other day, they were so amazing!! Do read the recipe, read the notes about not having the milk/butter too hot. If you’re not sure if it’s too hot, take it out of the pot, and place it on the counter to cool a little. The instant pot element stays hot for a while once you turn it off from melting the butter. READ all the notes if you’re new to baking and I’m positive you’ll have success!! I’m making these again now for family dinner tonight, these buns were a hit at home 🙂
Julia says
Omg – thank you so much for your comment!! I’ve been so sad today reading about other people saying how the recipe was bad. And I’ve made it so many time!! I’m so happy it worked for you!! When I made these yesterday I turned the sauté function off even before the butter finished melting. Then by the time I added the rest of the cold milk and cream it was the perfect warm temperature.
Jerri Stidolph Reynolds says
Making these now. Helps to lift the pan from the pot after first saute so the butter and milk will be sure to cool. Nice foam and yes, sticky dough now rising. Also live in Washington state but make no knead bread a lot so excited to see how these turn out. I was concerned about the amount of yeast, as no knead usually calls for less rather than more, but I’ll give it a try exactly as you wrote. Making rolls for Thanksgiving tomorrow at new neighbors, so this is a test batch…
Julia says
Please let me know how they turn out! I tested this recipe with more yeast and less yeast and I personally prefer more yeasty taste but they work fine with less yeast (just one envelop of yeast works great). I’ve made this recipe many many times and it always works (unless I kill the yeast), so months later and I am still very confused as to why many people have problems with it. I hope you are not one of them! Good luck!
Tracy says
This was the texture of a focaccia bread. Rolls were flat. Had I known in advance I would have added spices as such.
Julia says
They shouldn’t be flat. The dough rises a lot in IP. Did the dough rise after the first rise? If not, then it means the yeast didn’t work. Was the yeast foamy?
Jane Jensen says
Followed the recipe to a T. The dough was very sticky, almost like there wasn’t enough flour. Total flop, threw the hold pan in the trash.
Julia says
Did the dough rise in IP and double in size? It’s supposed to be sticky when forming the rolls, that’s why you coat your hands in oil.
Jennifer H says
I had the same thing happen. So sticky that couldn’t do anything with it.
I’m wondering if I switched the saute off too soon and it wasn’t warm enough for the yeast. It foamed and the dough raised, maybe not double though. I added flour while “forming balls” (never could form them correctly). They are on their second rise right now so we’ll see what comes out.
I have an 8Qt, so that may play a part in it not working well for me.
Julia says
I doubt that 8qt would make a difference. Instant Pot is just a way of letting the dough rise easy and relatively fast. I’ve made this same recipe with my regular KitchenAid as well with the same proportions. The dough is supposed to be sticky, that’s what makes the rolls light. Less flour = lighter and airier texture of the rolls. Not sure how sticky is too sticky. It all depends on a person. Also humidity at home may play a role in the stickiness of the dough. Hopefully the rolls will work anyway for you
Jennifer H says
They turned out ok. Not as fluffy and a very yeasty flavor. I expected them to not be as fluffy since I added more flour. I also used honey instead and if I do it again I’ll add more for a sweeter taste. They weren’t bad and we used them to make little sandwiches tonight.
I live in Washington so we have a very wet climate. Mine after rising the first time didn’t look like yours. They were so sticky, there was no way to even drop the dough off my hands. So I’ll decrease the milk next time or add more flour.
Thanks for the recipe!
Julia says
Wet climate may explain the stickiness of the dough since the flour wouldn’t be as dry and wouldn’t absorb the liquid as much. Do you ever make regular bread with a mixer? I would suggest using this same recipe with KitchenAid. Just add the flour while KitchenAid is kneading a bit by bit. Start with extra 1/8 cup and then add a bit more until the dough becomes the consistency of an earlobe (that’s the trick I learned). Then knead for 10 min in the mixer and let it rise like you normally would (I like keeping mine in a covered bowl in a sink full of hot water). This will let you know how much flour you actually need and then once you know the exact amount of flour for your climate you could use those proportions in your Instant Pot. As for the yeasty flavour – that’s how I like mine 🙂 you can decrease the amount of yeast to about 1 tablespoon
Leah says
What? Rolls in the instant Pot?! No knead, too? You have made me so excited to try this out, and I adore warm rolls for brunch, so this may be made for tomorrow. Thanks for the inspiration!
Melissa says
Warm, homemade bread and rolls are so good! I love the way you used the Instant Pot for the dough! I definitely need to try it. And my kids always think the rolls are the best part of any holiday meal (and it’s sometimes the only thing they eat), so they are a necessity!
Laurie says
Do these store well? For how long?
Julia says
They won’t be as fluffy and airy the next day but they still store well. Definitely at least 2-3 days in an airtight container. Don’t know about longer since I usually finish them by then
Gloria says
There is just something about making/baking bread at home that is so rewarding. Either by hand (not very ofter) or using a machine….the aroma of baking bread is THE BEST. My baba (with her worn hands) made bread from scratch ALL the time. I swear those ladies were work horses. With the farm and ALL the kids….homemade everything to feed an army everyday!! Anyway….I can just smell these baking. I have a bread machine…I am going to experiment with it and see how these turn out.
Diana says
Can I use gluten free flour to make these rolls?
Julia says
I don’t know unfortunately. I’ve never made bread with gluten-free flour so I don’t know how it would work. You could try and if the dough doesn’t rise then you can just roll it flat and make flatbreads or pizza. I’ve done that once when I killed they yeast because I added it to the butter/milk mixture that was too hot
Rosemarie says
I don’t have the yogurt button. What can I do?
Julia says
Unfortunately I don’t think you can use another function. At least I don’t know which one. In the post I provided suggestions on how to let the dough rise without the instant pot. It may take a bit longer than in IP though
Karen says
I wanted to make these today but I don’t have a yogurt button on my IP or my mini IP there should be another button you can use? These look so good
Julia says
If you read through the post I provided suggestions on what to do if you don’t have a yogurt button. Unfortunately I don’t think you can use your IP for the dough to rise. You’ll need to let the dough rise in a regular bowl instead