Instant Pot No Peel Hard Boiled Eggs are easy to make, really convenient, and they have the most delicious creamy egg yolk. Perfect for healthy snack, breakfast, or meal prep.
This post contains amazon affiliate links which means if you make a purchase after clicking one of those links, I will receive a small commission.
I have a love and hate relationship with hard-boiled eggs. I love eating them but I hate making them. Well, let me clarify. I hate making them on the stove.
Yes, boiling eggs is one of the first thing that anyone learns how to make. Yes, it is easy. I do not dispute it.
I just really dislike boiling eggs. I don’t like that I have to wait for the water to boil. I don’t like counting minutes and seconds. I don’t like cooling them in ice water. \
My dislike of boiling eggs even propelled me to learn how to bake perfect boiled eggs in oven. I love this method so much that I even shared it in my new cookbook, The Ultimate One-Pan Oven Cookbook.
So, do we really need yet another method to make hard boiled eggs? Well, I honestly think we do. Because Instant Pot No Peel Hard Boiled Eggs make all other methods pale by comparison!
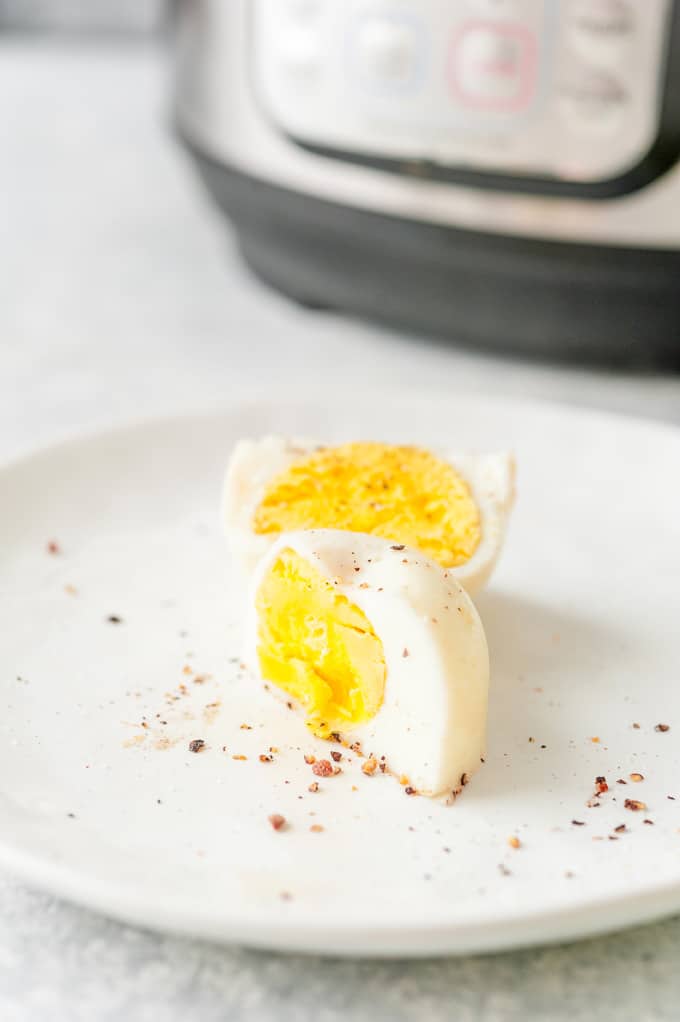
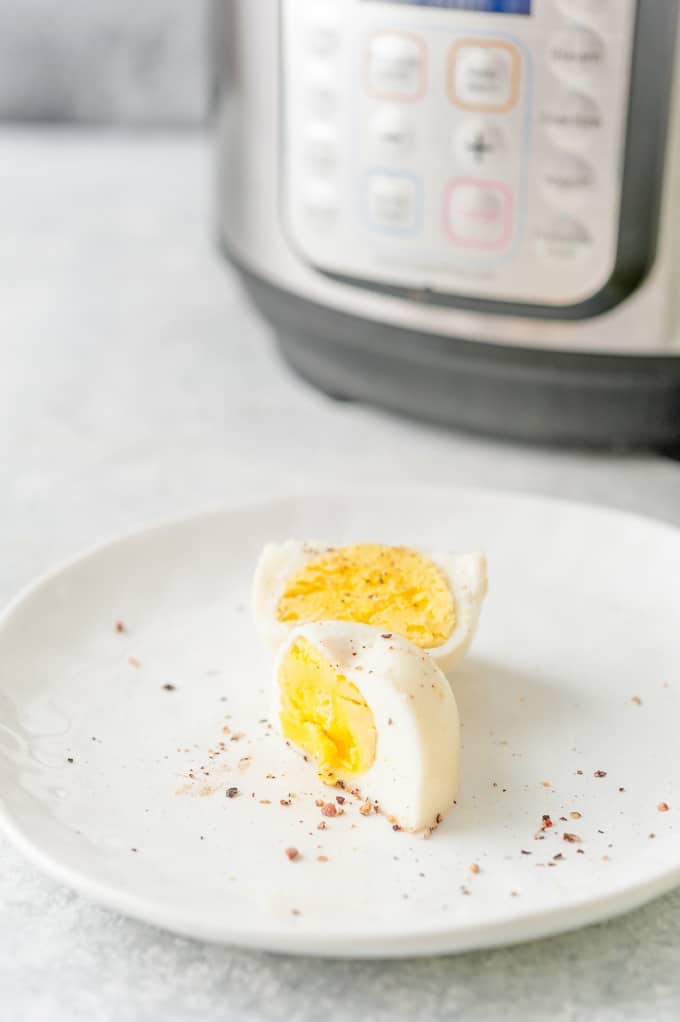
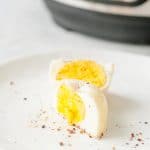
No Peel Hard Boiled Eggs made in Instant Pot (or another electric pressure cooker) are creamy, delicious, and fast. Perfect to make a couple on a busy weekday morning or make a big batch on the weekend and keep in the fridge for an easy meal prep throughout the week.

Why make Instant Pot No Peel Hard Boiled Eggs
Instant Pot is absolutely amazing to make regular hard boiled eggs. They peel absolutely magically and if you want to try the use this method for Instant Pot Hard Boiled Eggs form My Wife Can Cook.
But if you’d like to omit a step of peeling eggs and would like to eat hot hard-boiled eggs without needing to cool them first and peel, then this method of making No Peel Hard Boiled Eggs is for you.
- No need to peel – easy, fast, great to use in egg salads.
- Eat hot eggs – no peeling means no need to cool the eggs first in order to handle them.
- No cracks – even with Instant Pot, eggs sometimes crack and leak out. No peel means no cracks.
- You can season the eggs before they are even cooked if you’d like.
- Great for easy meal prep.
How to make Instant Pot No Peel Hard Boiled Eggs
Making No Peel Hard Boiled Eggs is easy but you do need an extra accessory to make them. If you are interested in buying more accessories then check out my list of 9 Ultimate Instant Pot Accessories You Need to Buy.
- Add one cup of water to the inner pot of your Instant Pot (this is the specific model that I use).
- Place a trivet that came with your Instant Pot inside.
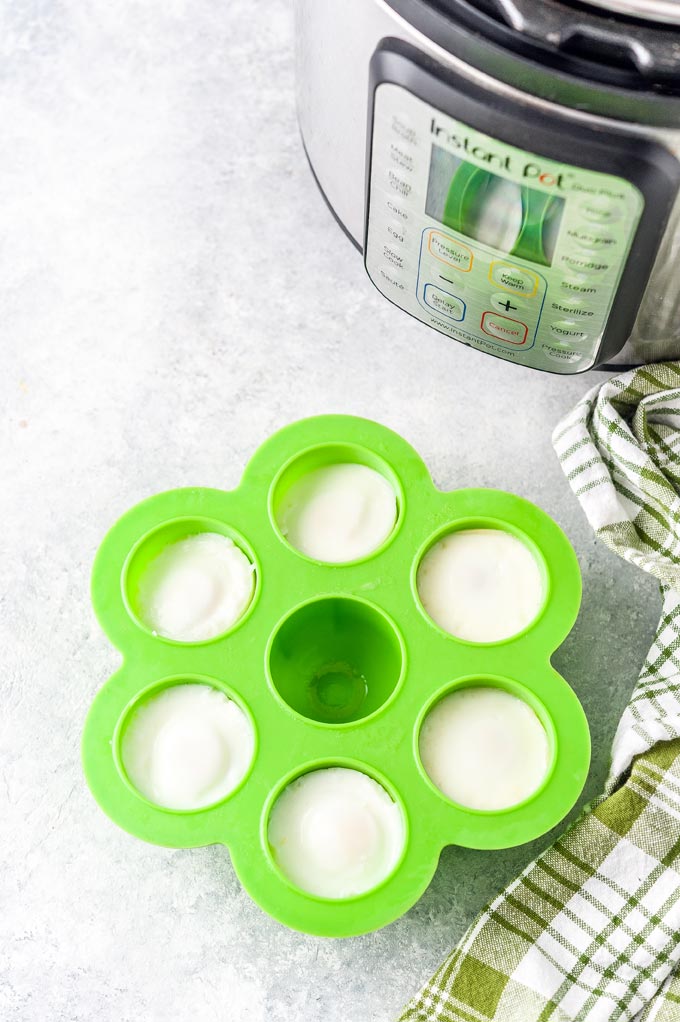
- Spray inside of silicone egg bites moulds with cooking spray. Note: You really do need to spray the moulds or the eggs will stick. I tried both and the egg white sticks to the mould without the spray.
- Carefully crack an egg into each of the egg bites mould cavities without breaking the egg yolk.
- Place the egg bites mould on the trivet inside Instant Pot.
- Close the lid and seal Instant Pot.
- Cook on High Pressure for 7 minutes. (See notes about timings in the section below)
- Do a Natural Pressure Release for 3 minutes.
- Finish with Quick Release.
Optionally you can season the eggs with salt and pepper right after you cracked them into the moulds.
TIP: You can stack two egg bites moulds on top of each other thus making a dozen no peel eggs at a time!
Timing to make No peel eggs
I use this specific mould to make my no peel eggs. However, since I bought it on Canadian Amazon, I couldn’t find it on American Amazon. Different egg bites moulds vary in thickness of the silicone.
My mould is relatively thin so 7 minutes on High Pressure makes the most beautiful hard-boiled egg yolk I’ve ever seen! It’s velvet in consistency, gorgeous yellow without any hint of liquid egg yolk or green ring.
But different moulds may yield different results. Some moulds may require longer cooking time. I would suggest trying 1 egg first and then adjusting the timing for your particular silicone egg bites mould. It may take up to 12-14 minutes. Or, alternatively, it could take less than 7 minutes.

Meal prepping with Hard Boiled Eggs
I don’t do a lot of meal prepping. I don’t work in an office now, so grabbing something from the fridge for lunch is pretty easy. But I started doing meal prep lunches on occasion and I have to say – I love them!
Having everything already measured out is a time-saver. It also allows me to not over-eat and helps with portion control. One of my favourite Meal Prep Lunches is Steak and Mushroom Salad.
Using these Instant Pot No Peel Hard Boiled Eggs makes meal prepping snack bowls a breeze.
- Cut up a few veggies, such as carrots, peppers, cucumbers
- Add a small container of dip: use store-bought or homemade hummus or other dip. You can even just use cottage cheese.
- Add a few wedges of pita or a few crackers
- Add one or two hard boiled eggs
Voila! These Meal Prep Snack Bowls with Hard Boiled Eggs will keep in the fridge for 2-3 days and you’ll have a beautiful, filling, and healthy snack.
I am a newbie meal prepper but I’ve been taking cues from Carmy of Carmy – Run Eat Travel who is a meal prep queen. I pretty much want to live in her neighbourhood so that she feeds me all her meal prep bowls.
Carmy recently wrote a totally amazing e-book about Meal Prep Basics. I actually have my own copy and it’s incredible. She even has sample timeline on how to make sure you minimize your time cooking while maximizing the amount of recipes you make.
There are chapters on snack ideas. There are tips on cooking veggies and grains. There are recipes.
If you are thinking of learning how to meal prep then you must buy her e-book. It really is great!! (Not affiliate link, I just really love her e-book)
How to store No Peel hard Boiled Eggs
I love making a whole dozen of these Instant Pot No Peel Hard Boiled Eggs. Store them in an airtight container in the fridge for up to 1 week.
I am a big fan of plastic Lock & Lock Food Storage Containers, so they are the ones I use most of the time. But I also use their glass containers, which, by the way, are also oven-safe, so they can double as baking dishes.
More Instant Pot Egg Recipes:
- Instant Pot Fruity Egg Bites
- Fail-proof Instant Pot Poached Eggs
- Instant Pot Russian Potato and Egg Salad
DO YOU WANT MORE INSTANT POT RECIPES?
Join my Real Ingredients Instant Pot Recipes Facebook Group!!! It’s a fun and safe place to share your own Instant Pot recipes made with Real Ingredients.
Instant Pot No Peel Hard Boiled Eggs
Ingredients
- 12 large eggs
- cooking spray
Instructions
- Add one cup of water to your Instant Pot (don't forget to use an inner pot).
- Place a trivet that came with your Instant Pot inside.
- Spray inside of silicone egg bites moulds with cooking spray. Note: You really do need to spray the moulds or the eggs will stick. I tried both and the egg white sticks to the mould without the spray.
- Carefully crack an egg into each of the egg bites mould cavities without breaking the egg yolk.Optionally: you can season your eggs with salt and pepper at this point if you'd like, although I prefer to season mine after they are cooked.
- Place the egg bites mould on the trivet inside Instant Pot.
- Close the lid of your Instant Pot and turn the valve to Sealing.
- Press Manual or Pressure Cooker button (depending on your model) and use the arrows to select 7 minutes. (See notes about timings in the post above. The type of silicone egg bites moulds may affect the timing of cooking)
- It should take about 5-7 minutes to come to pressure. Might be a bit less or more depending on your model and depending on the temperature of the eggs as well as how many eggs are in Instant Pot. Using two egg bites moulds, for example, will take closer to 10 minutes to come to pressure.
- Once the Instant Pot beeps that the 7 minutes of cooking are done, do a natural pressure release for 3 minutes. This means you let your Instant Pot release pressure naturally without touching it for 3 minutes.
- After 3 minutes of natural pressure release, do a Quick Release. This will take about 1 minute.
- Open the lid and carefully remove the egg bites mould (it'll be hot so use gloves). There will be a few drops of condensation liquid on each egg, that's expected.
- Run a dull butter knife around each egg to loosen it a little bit. Place a plate over the egg bites moulds and inver the eggs onto it.
- Eat hot or store in an airtight container in the fridge for up to 1 week.
Video
Notes
Nutrition
Mention or tag @Imagelicious

Joyce says
Sort of funny/humorous story here: I’ve known about this method of cooking boiled eggs for about two years, but it’s also been about that long since I’d used it. After looking up the instructions on Pinterest for how long to cook them—on a site I don’t think I’ve ever used, and where the did not use or indicate any kind of NPR time—I went ahead and cooked 7 eggs this way. What came out after they’d cooled in the mold for a bit was nothing but poached eggs, which would be wonderful if I could have had toast with them (I cannot eat any grain products at all).
That 3 minutes of NPR is crucial to fully cooking the eggs so they’re BOILED eggs, not poached!
Thank you for specifying the natural pressure release time in your vlog; it makes all the difference in the world between a really good finished food (your recipe) versus a sloppy mess that pretty much wasted seven eggs (the other site’s instructions).
Jen says
I love this method, thanks for sharing! You’ve saved me from a lot of tedious and messy egg peeling. I don’t cover the eggs either, and the little bit of water that accumulates just rolls right off when I pop the eggs from the mold.
Julia says
I know! Love cooking the eggs this way!
Marie says
When I make egg bites I have to cover the mold to stop water from getting in. Is there a reason why you don’t cover the mold for just boiled eggs?
Julia says
In my experience covering something with foil increases cooking time. In this particular case, since eggs aren’t whisked and mixed with other flavours, it doesn’t really matter if the water drips in as it doesn’t dilute the flavour or get inside eggs, it just gets round the eggs, similar to how it would be if you poached eggs on the stove. Also the amount of water is negligible. So, I chose to not have a foil cover to reduce cooking time by a minute or two. You can cover with foil if you’d like but you might need to add an extra cooking minute or extra natural pressure releasing time
Tracy says
I love this idea! Is there a reason that you don’t use the center of the mold?
Julia says
Hey – no, no reason. I was making 12 eggs so I used 6 moulds in each 🙂